This website is supported by its readers. If you click one of my links I may earn a commission. I am also a participant in the Amazon affiliates program and I will also earn a commission from qualified purchases.
Whilst many people opt for purchasing store-bought trees, Misho better known as the art of growing bonsai trees from a seed is becoming more and more popular. So how exactly do you grow a bonsai tree from a seed?
Use scarification and stratification to help your seeds germinate. Plant these in bonsai potting soil consisting of akadama and volcanic ash rock. Continuously provide sunlight, water, and general care such as repotting and pruning until your tree matures.
So what species are the best to grow a bonsai tree from a seed? And what are the advantages and disadvantages of growing a bonsai tree from a seed? Keep reading to find out more!
Just a quick heads up, over the past three years of running Plantpaladin, hundreds of people have asked for product recommendations. As such, You can find my favorite indoor bonsai tree here (link takes you to Bonsaiboy), my favorite outdoor bonsai tree (link takes you to Bonsaiboy), or have a look at all the products I recommend here.
Decide on the tree you want to grow
So first up is a step that all too many people forget when starting the journey of growing a bonsai tree from a seed – simply deciding on the bonsai tree species they want to grow.
Now the species of bonsai you want to grow will all come down to personal preference however there are a few questions you should ask yourself:
- How much experience do you have in growing and maintaining bonsai trees?
- Do you live in a space with a garden/yard, or do you intend on keeping your bonsai tree indoors?
- Would you prefer it if your bonsai tree had flowers? Or would you like your bonsai tree to have fruit?
- How much time do you have to dedicate to your tree? Would you prefer a fast-growing bonsai tree or a slow-growing bonsai tree?
- Do you keep pets or do you have young children who might be allergic to certain tree species?
This is my first time growing bonsai from a seed – What tree is best for me?
If you are a complete beginner then there are a few fantastic trees that you can grow a bonsai tree from a seed.
These include:
- Chinese elms
- Ficus
- Fukien tea
These trees have a fantastic breadth of information out there about how to keep them correctly and are all very easy to keep.
These seeds can be sourced very easily and have the added benefits of being able to be grown both indoors and outdoors.
I live in an apartment – what bonsai should I keep
If you live in an apartment or a space that does not have a lot of greenery you must invest in a tree that can thrive indoors.
Luckily a lot of trees can be trained indoors including
Just ensure however that you avoid coniferous trees with needle-like leaves such as Scots pines or Junipers which are hardy and prefer colder conditions and being kept outdoors year-round.
I want my seeds to grow fast – What bonsai tree seeds should I buy?
As bonsai trees are not one species of tree but instead come in a variety of different species, they grow at different rates.
If then you are tight on time I would opt for a fast-growing tree species.
Fast-growing bonsai species include:
- Chinese elm
- Maple
- Ficus
- Pine
Slow-growing bonsai tree species include:
- Fukien tea
- Jade
- Azalea
For a full breakdown, hopefully, the table below will help – it shows the most common bonsai species people tend to buy and how fast they grow per year:
Bonsai species | Growth type | Time to maturity | Average growth per year |
Chinese Elm | Fast | 3 years | 12 to 36 inches |
Juniper | Moderate | 4 years | 5 to 12 inches |
Jade | Slow | 5 years | 2 to 5 inches |
Maple | Fast | 3 years | 12 to 36 inches |
Fukien Tea | Slow | 5 years | 2 to 5 inches |
Ficus | Fast | 3 years | 12 to 36 inches |
Wisteria | Slow | 5 years | 2 to 5 inches |
Cotoneaster | Moderate | 4 years | 5 to 12 inches |
Pine (most varieties) | Fast | 3 years | 12 to 36 inches |
Azalea | Slow | 5 years | 2 to 5 inches |
I want my seeds to grow into bonsai with flowers or fruit – what should I opt for?
So if you are interested in growing a bonsai tree that has fruit or contains flowers I would check out my specific pots on those but to summarise:
Apple, Crab apple, lime, lemon, and fig tree bonsai are amongst the best fruiting bonsai species. For flowering bonsai, consider investing in magnolia, azaleas, serissa, cherry blossom, and other cherry varieties.
Just be aware that investing in certain flowering species such as sago plum or azalea can be toxic to pets.
Ensure it’s the right time of year
So you know what bonsai tree you are going to grow, and what tree suits your day-to-day life, next up it’s important to take note of the time of year.
Most bonsai tree seeds propagate and grow best when planted in the fall if the bonsai tree is grown locally and the seeds are ripe.
That being said, seeds will often need to go through processes known as scarification and stratification (don’t worry, we will go into detail on this later on) to help them adapt to the climate and the time of year if the species is not native to the country you are growing it in.
Seeds will typically be their ripest and have the highest chances of propagating. germinating when picked and planted fresh – for most species this would be undertaken during the middle of the fall or between September and November.
To help summarize I’ve put together a table below:
Month/Time of year | Should I plant my bonsai seed |
Fall (September - November) | Plant seeds only if they are fresh and ripe and available locally. I would typically only plant seeds at this time of year if they come from an existing bonsai tree in my collection or are grown natively in your climate. |
Early Spring | Most bonsai tree species will benefit from being planted in the early spring if they are not native to where you live. |
Now if the bonsai tree seeds you have decided to opt for are out of season, or not native to your country or climate, research your species, take note of when it is planted in its native country and do your best to closely resemble this during the plating process.
Consider growing kits
Whilst Misho traditionally is undertaken through growing seeds completely from scratch, advancements in technology have meant that growing kits have become more and more popular.
The general idea of growing kits is that these kits come prepacked with a germinated seed and the right potting soil for your tree.
You then place the soil (usually placed together in a small disc-like shape) with hot water and as it expands over the next few days, the seed will become fertilized and start to grow.
Whilst this isn’t technically growing a bonsai tree from a seed. If you are adamant that you want to grow a bonsai tree in the fastest possible time whilst making as few mistakes as possible then consider investing in one of these.
My recommendation would have to be garden republics growing kits which can be found here (link takes you to Amazon).

They come in a variety of different species and are amongst the best sellers in their category
Purchase your seeds
So you’ve decided what trees species you want to grow, understand that it is the right time of year, and decided not to opt for grow kits.
Next up, you need to buy or get your seeds.
Now there are no specific bonsai tree seeds that will magically grow into bonsai trees, instead, you will be getting regular seeds that will grow into regular plants/trees.
There are three main ways you can do this:
- Buy them from a reputable retailer near you
- Order them online
- Pick them yourself for free
Buying bonsai seeds from a retailer
Buying bonsai seeds from a local retailer has a few benefits.
First, these seeds are much more likely to be adjusted to the climate you live in already.
As a beginner, this is going to save you a lot of time and will prevent you from needing to go through the scarification and stratification process.
On top of this, most retailers who sell bonsai seeds are specialists in bonsai.
Herons bonsai in the UK, for example, specializes in only selling bonsai which means you can easily troubleshoot any issues you might have when trying to germinate your trees.
The only downside to this is that the stock that reputable retailers hold varies and you might not have thas large a selection as you would like.
On top of this, seeds bought in-store are typically slightly more expensive than they would be were you to buy them online.
Buying bonsai seeds online
For most of you, buying bonsai seeds online is your only option.
Whilst bonsai retailers are out there, they are still specialty stores with only one or two being available in most states in the USA at least.
The good news is that if you do decide to opt for buying seeds online, via Amazon or other popular retailers, these tend to be less expensive than buying them in person.
Also, if you have a large bonsai collection already, and want to purchase a more specialty species of tree that will make your bonsai collection stand out, this too can easily be done with there being a massive selection of seeds.
Pick your seeds yourself
Now if you don’t want to purchase any seeds and instead want to use seeds from nearby trees such as apple trees you can do this.
Oak trees, for example, can be grown from acorns.
If you do decide to opt for this method however there are a few things you should do first:
- Ensure you have permission to pick the seeds from the tree.
- Only pick seeds directly from the tree – For example, only pick acorns directly from the tree or apples from the tree as opposed to picking up seeds from the ground – seeds from the ground will have likely already started to rot and will not germinate.
- Keep these seeds moist as you transport them – I like to do this by filling up a plastic bag and spraying with a few sprits of water or better yet using something like sphagnum moss.
- Only pick the seeds when the species of tree is ripe – If you pick apples that have not ripened or acorns before they start to bulge then they will fail to germinate, only pick up seeds when your species is at its ripest.
As a rule of thumb, most fruiting and flowering bonsai species ripen in the later summer/fall so seeds should be picked directly from these then.
How many seeds should you buy?
The more seeds you have for your bonsai tree species, the better chances you will have of one of the seeds propagating. Not all the seeds you purchase will germinate and so selecting and plating 40 to 60 seeds will give you the greatest chance of these growing.
Now if you do not have space to grow out and propagate 40 seeds, as a beginner, I would recommend plating at least 10 seeds, even if only 10% of them germinate, this gives you the ability to grow one bonsai tree.
Scarification
So if you have chosen seed from a tree species that are in season or is native to your location then you can skip the steps on scarification and stratification and move onto the step around potting soil.
For most of your though, if you have selected a bonsai tree species that are not native to where you live and you want to plant it out of season then following the processes of scarification and stratification will be an important step to propagate your trees.
What is scarification
Scarification is the process of softening the outer shell of the seed to allow water into the seed. This will speed up the process of germination particularly for seeds that are traditionally tough.
When do you need to do scarification?
Scarification needs to be undertaken if you own a bonsai tree species that need to experience the cold before the warmth.
For example, deciduous species such as maple need to sense the difference in temperature in the winter before the warmer temperatures of spring prompt them to propagate.
Using scarification then helps bypass this process, so if you have a bonsai tree seed that needs to be planted in the fall to sprout in the spring, scarification will allow you to plant the seed during any time of the year without having to worry about planting it the right time.
What bonsai species work best for scarification?
Bonsai tree species with tough seeds such as redbuds or eucalyptus typically work well with the scarification process. These seeds often need help in cooler climates than they are used to.
Other species of bonsai that have tough seeds and are not being grown in their native county will also benefit from scarification.
Can I use scarification and stratification together?
Scarification is typically only reserved for species with tougher seeds. Scarification should be undertaken before stratification. Not all species that require stratification however will need scarification.
How do you undertake scarification?
There are three main ways of undertaking scarification.
These include:
- Eroding the side of the seed
- Making a small hole
- Using hot water
Let’s explore these in more detail:
Eroding the side of the seed
One of the older methods of scarification is to weaken the shell of the seed.
The theory behind this is the weaker the shell, the better the chances the roots of the tree will be able to penetrate the seed.
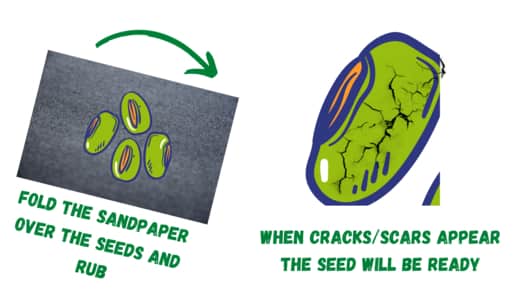
The main method in which this is done is by using an object to wear down the sides of the seed.
This is most commonly done with sandpaper but can also be undertaken with a nail file or any item with a rough edge such as a metal sponge.
To scarify using this method, use either two sheets of sandpaper or wrap your seed in sandpaper.
Then rub the seed down through the sandpaper in a clockwise and then anti-clockwise direction.
Check after every 30 seconds to see if the seeds are being scratched, if so you can stop scratching. Harder seeds may need more effort.
Making a small hole
The second method of scarification is to simply pierce a small hole in the side of the seed to allow the growth of your seeds to shoot out.
Use a sharp knife or blade and pierce a tiny hole in the side of your seed.
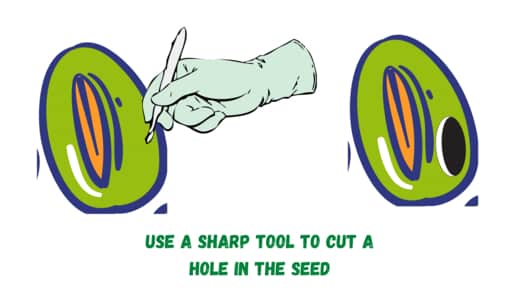
You can then apply smaller scratches to the seed if it is tough enough mimicking the eroding the seed method.
Using hot water
The hot water method of scarification is easily the most common and popular method of scarification.
To do this fill a bucket or pot full of hot water.
This water should be hot but not boiling so a temperature of about 80 degrees works perfectly for most seeds. Now the exact temperature of water you will need for scarification will vary from species to species.
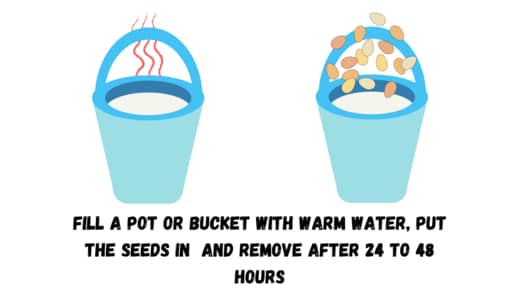
To help this, however, I’ve come up with a table below which should help:
Bonsai seed species | Time in water | Temperature of water for scarification |
Scots pine | 12 hours | Warm water |
Oak | 12 hours | Warm water |
Juniper | 12 hours | Warm water |
White Pine | 12 hours | Warm water |
Maple | 24 hours | Hot water |
Elm | 24 hours | Warm water |
Red maple | 48 hours | Hot water |
Eucalyptus | 48 hours | Hot water |
Redbuds | 48 hours | Hot water |
Then turn off the heat and let the seeds soak in the water as it cools for 12 to 24 hours.
Some seeds will float to the top and should be discarded as these seeds will not germinate.
Then after 12 to 24 hours, the seed’s outer shell should soften, making them ready to move on to the next step.
What to do after scarification?
Once your seeds have gone through the scarification process, they should be moved straight into the stratification process.
Stratification
The next step of the process of preparing your seeds is stratification.
Whilst scarification is only really needed if your seeds are tough, stratification is much more common, and used for most species that are not native to the country they are being grown in.
What is stratification
Stratification is the process of exposing your seeds to cold or warm temperatures to activate winter conditions, allowing you to plant your bonsai tree seeds at temperatures and seasons your tree would not normally grow in.
An example of this would be if you purchased seeds for a Japanese white pine. Whilst these are planted in the fall in Japan, the temperatures and conditions in the autumn in Japan will be different from autumn/fall in countries like the UK and USA.
For the seeds of this tree to sprout in spring, as they would normally, these seeds will need to be treated via the stratification process.
Stratification then will mimic the winter conditions needed for your seeds to sprout in the spring as they would normally.
How do you undertake stratification
There are two main methods of stratification:
- Cold stratification
- Heat stratification
Cold stratification
This is the most common form of stratification.
First, follow the above steps of scarification if your species require you to do so.
Then place your seeds in a plastic bag – I find that cheap ziplock bags work best for this.
Ensure that the inside of the plastic bag is kept moist, this can be done with a few sprays of a water spritzer, by placing sphagnum moss on the inside of the bag, using a moist paper towel, or using a soil type such as peat.
Then store your bag in a fridge for 1 to 6 months.
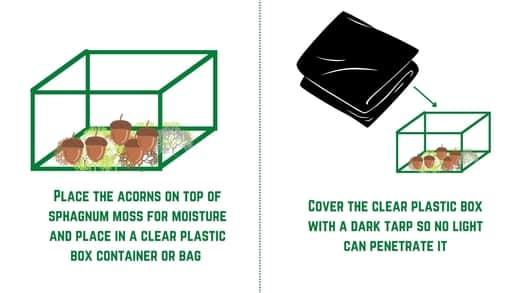
An example of what stratification will look like when it is undertaken with an acorn
For most species, the sweet spot will be between 90 and 120 days.
Some species such as oak, benefit from blackout spaces so should your species do so, cover it with a black bag or covering to prevent any excess light from interfering with the germination process.
After the period, some of your seeds will have started to germinate and will then be ready to be planted.
Heat stratification
Warm stratification will only be needed when your bonsai tree seeds need larger changes in temperature before they start to germinate.
Heat stratification then is used to break up the process of cold stratification.
Bonsai seeds are removed from the freezer for cold stratification and left at room temperature for some time before being moved directly back into cold stratification. This will vary depending on the species so be sure to check the instructions for your seeds to see if you need to follow heat stratification
To find out how long your seeds should follow the stratification process I’ve put together a table below:
Bonsai seed species | Time in the refrigerator for cold stratification | Time at room temperature for heat stratification (after cold stratification) |
Scots pine | 90 days | 60 days |
Oak | 30 days | None needed |
Juniper | 60 days | 30 days |
White Pine | 90 days | 60 days |
Maple | 24 hours | 60 days |
Elm | 60 days | None needed |
Red maple | 60 days | 60 days |
Eucalyptus | 60 days | 60 days |
Redbuds | 60 days | 60 days |
What to do after stratification
After the stratification process, your seeds should be ready to be planted, regardless of what time of year it is.
You can then move on to planting your bonsai tree seeds. A good thing to look out for here would be small roots starting to shoot off the seeds as signs of germination and propagation.
Invest in the right potting soil
A few days before you plant your seeds is the perfect opportunity to purchase and gather the right potting soil for your bonsai.
Bonsai tree potting soil is an in-depth topic all unto itself which is why I wrote a post on it here.
To summarise however all good potting soils need to have 3 main elements to them:
- Aeration
- Drainage
- Moisture retention
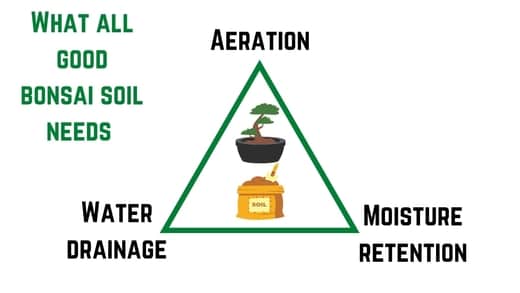
Should your soil not have enough aeration, your roots will be suffocated in the soil.
Too little drainage will cause your roots to become waterlogged and lead to things like root rot.
Not enough moisture in your soil will cause your soil to become dry and cause your roots to shrivel up.
So what soil is best
The best potting soil mix for most bonsai tree species seeds has to be an inorganic mix of akadama with grit such as volcanic ash rock.
For inorganic mixes for both deciduous and conifers aim to have a rough mix of 50% akadama, 25% volcanic ash rock, and 25% pumice.
Organic material such as peat or cactus soil can also be used in a ratio of 60% akadama, 10% lava rock, and 10% of your organic soil mix of choice.
The PH level of this soil should be neutral too if possible keep this between 6.5 to 7.5 and invest in something like a PH level checker as a way to keep this under control.
I’ve listed a table below with some of my favorite potting soil varieties:
Brand | Good aeration | Good Moisture retention | Good moisture flow | Suitable for all species | Suitable for all seasons | Overall rating |
Easternleaf Organic Mix | Yes | No | Yes | Dry and tropical species only | Summer | 8/10 |
Perfect Plants Organic Mix | No | Yes | No | Yes | Spring and Summer only | 7/10 |
Easterleaf inorganic mix | Yes | No | Yes | Yes | Fall/Winter | 8/10 |
Easternleaf akadama | Yes | Yes | Yes | Yes | Spring/Summer | 9/10 |
Boon inorganic bonsai soil mix | Yes | Yes | Yes | Yes | Year-round | 9/10 |
Easternleaf Akadama, pumice and ash | Yes | Yes | Yes | Yes | Year-round | 10/10 |
Plant your seed
So your seeds are ready and your potting soil is good to go, now it’s time to plant your seeds.
First, select the right pot.
At this stage using a shallow or expensive bonsai pot isn’t something I would recommend as you will repot your tree in a year or so into one of these.
I find that using smaller 2 to 3-inch pots works best for potting seeds.
If you don’t have any available, just use disposable yogurt pots that you can find and drill a pencil-sized hole in the bottom of them.
Start by filling your pot of choice with the soil.
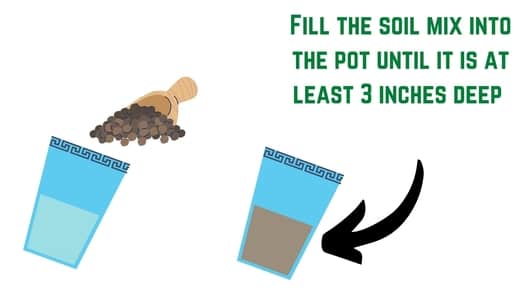
Then make an indentation in the middle of the soil either ¼ to ⅛ of an inch deep depending on the species and place your seed with the roots ideally facing downwards.
You can then cover the indentation with the remainder of the topsoil until the soil is level.
For a full idea of soil levels for your species, the table below should help:
Bonsai seed species | How deep you should sow the seeds |
Scots pine | ¼ inch deep |
Oak | ½ inch deep |
Juniper | ¼ inch deep |
White Pine | ¼ inch deep |
Maple | ½ inch deep |
Elm | ¼ inch deep |
Red maple | ¼ inch deep |
Eucalyptus | ¼ inch deep |
Redbuds | ¼ inch deep |
Keep in a propagator for a few weeks
At this stage, some people would recommend moving your tree into the place where you will keep them year-round.
For me, I like to throw in this additional step just to ensure that your seeds have the best chance of growing into seeds.
Using a propagator will allow you to control the exact light, temperature, and humidity levels your newly planted seeds will receive daily.
A propagator will also provide a layer of protection against insects, birds, and squirrels that like to dig up these seeds.
As such, I’d recommend moving your plants into the propagator for 2-6 weeks until they start to show signs of shoots growing through the topsoil.
You can then move these into the right environment.
Move into the right environment
Now your seeds have started to grow a bonsai tree from a seed in your propagator, it’s time to move them into their new home.
Most of your will have bought bonsai tree seeds for species that thrive outdoors.
If this is the case, start by moving your trees into the shade for a week, then ease them into half the week in the shade and half the week in the sun.
In week three, move your seeds into full direct sunlight or where they will remain during the growing season.
What if I want to keep my bonsai indoors?
If however, you have got seeds for a bonsai tree that thrives indoors such as olive, elms, or ficus, then move your tree into a space away from windows for the first day or two, and gradually move it closer to either your grow light or window where it can get plenty of sunlight.
Maintain and care for your tree in its first year
So now it’s all about nurturing your tree in its first year.
This will mainly consist of the following:
Providing enough sunlight
Bonsai trees require a lot of sunlight, in the summer some species need as much as 8 hours of direct sunlight per day to keep healthy.
Move your trees then into the brightest spot of your garden depending on your species, which you can read up more on here.
Alternatively, if you keep your tree indoors, invest in a grow light with a full-color spectrum that will ensure your tree is kept as healthy as possible.
Water regularly
Finding the right balance of watering your bonsai seeds but not overwatering them will be key.
As a rule of thumb, only water your bonsai tree when the topsoil is dry to the touch.
In summer this is likely once to twice per day and in winter, for outdoor species, this is typically about once per week.
Using rainwater can also be a fantastic natural option.
Fertilize
Bonsai trees will benefit from both traditional and liquid fertilizers.
Aim to fertilize your tree once per month during the summer for most species.
Ensure your fertilizer has an even N-P-K ratio.
Most trees do not need to be fertilized during the winter.
Temperature
Take note of the temperature that your bonsai tree thrives at, ensuring it is not too hot or too cold.
Tropical species such as jade or ficus, will not thrive even in mild temperatures and need to be kept outdoors.
Other species, such as Junipers or Scots Pines are hardier and can thrive in most conditions outdoors in the USA.
To maintain and control the temperature year-round, consider investing in a greenhouse.
Winterize your tree if necessary
So in your seed’s first year of being planted, you may need to look at winterizing your seedling.
Some tree species such as olive, cannot survive in the direct outdoors in temperatures below 0 and so need to be moved in a cold spot away from the elements.
This will stop your newly sported seedlings from freezing and dying off during winter.
This can be done by simply moving your bonsai tree to a cold garage or better yet, building a cold frame to help manage and maintain your tree during this period.
If your bonsai tree can survive outdoors, some level of protection should still be undertaken to prevent frost from attacking your tree, or your branches from dehydrating.
To read up more about how to do this with outdoor species you can read up more on winterizing bonsai here.
Repot your bonsai
After one year of growth in its small container, your roots will have expanded and hopefully, your new shoots will have outgrown the pot they are in.
The next step then when you want to grow a bonsai tree from a seed is to repot your tree.
This will typically have to be undertaken once every 2-3 years for younger bonsai trees.
To summarise, however, first choose a pot with enough drainage holes for the size of your tree.
This will vary depending on how fast-growing your bonsai species is but the table below should help.
Then use a root tool to remove the soil for your tree and trim the roots.
The place in your new pot with soil, and wire the tree into place to prevent moving.
Finish up by caring for your tree as you would do normally.
Develop the trunk of your bonsai
So after repotting your bonsai, you’re probably wondering, when will my bonsai tree start looking like a bonsai tree.
Well over the next few years you will be developing your bonsai tree and training your tree to look like a miniature tree.
The first place I would recommend beginning is by coming up with a rough style of bonsai tree you want to go for.
Bonsai trees come in a wide variety of styles and can be simple like formal upright to complicated like a cascade.
Once you have an idea of how you want your tree to look it’s time to start developing your tree.
This process should start with developing the trunk of your tree.
How to develop the trunk of your bonsai tree
There are three main ways you can train the trunk of your tree:
- Growing a sacrifice branch – This will thicken up the trunk of your tree over a few years.
- Bonsai trunk chopping – Chopping the trunk of your bonsai will allow you to grow out a natural taper in your tree
- Bonsai trunk bending – This process removes a segment from your trunk and allows you to and movement in your trunk. This is good for styles such as cascade.
These processes will need to be undertaken for a few years before you are happy with the thickness and girth of your bonsai trunk and branches.
Wire your tree
Once your tree’s trunk has been strengthened you can then move on to wiring your tree branches.
Wiring your branches is done to add movement to your tree branches and make your tree look more aesthetically pleasing.
As your tree grows in the new directions the wire dictates, the more stylistic your tree will look.
This is again an entire process which you can find out more about here but to summerise:
- Wrap copper or aluminum wire across your trunk as an anchor point
- Then wrap the branches of your tree at a 45-degree angle
- Gently move the branches into the new position
- After 6 to 8 weeks, remove the wire with a sharp pair of scissors.
Prune the tree
In between the processes of wiring and developing your trunk, it’s important to trim and prune your tree too.
If your branches get too big or your leaves become too overgrown, trimming and pruning your tree will ensure it grows in the exact style you are going for.
Simply use a sharp pair of shears or another bonsai accessory, and cut the bonsai tree and the end of the branch, at the petiole of the leaf or wherever it grows out of the silhouette that you are opting for.
Pruning can also help create a denser canopy of leaves and better ramifications through the process of defoliation.
Protect your bonsai from pests
Pests are going to be a constant worry for your tree, not only when you grow a bonsai tree from a seed, but during its lifetime.
As such invest in a good pesticide, either chemical or natural, and check your bonsai tree regularly for signs of insect and pest infestation.
Common pests include:
Natural pesticides such as parasitic wasps or ladybirds can also be used to help fight these pests.
Repeat the process until your tree is mature
The steps laid out above will cover the growth of your bonsai trees from when it is planted from a seed until it is about 5 years old.
That being said, if your tree is a slower-growing species such as jade, you may need to continue this process a few times to have a tree that resembles a bonsai tree.
Growing a bonsai tree from a seed is a relatively long-term process but by coming up with a schedule and following the steps laid out in this post, you will master the art of misho.
How long does it take to grow a bonsai tree from a seed?
On average it will take 10 years to grow a bonsai trees from a seed. Fast-growing species such as elms can mature into a bonsai tree from a seed in 7 to 8 years. Slower growing species such as jade can take 12 to 15 years.
What bonsai tree species grow the fastest?
Chinese Elm, Maple, Ficus, and Pine are all fast-growing species that are commonly used in bonsai trees. These can reach full maturity between 5 to 10 years and can actively resemble bonsai trees in as little as 3 years.
Can you grow a bonsai tree from a seed indoors?
Bonsai tree species such as Ficus, Elms, Jade, and Fukien tea can all be successfully grown indoors. Ensure you provide them with plenty of sunlight by using an LED grow light if you live in a climate with not much sunlight.
Survey on how to grow a bonsai tree from a seed?
So I didn’t want to just give my opinion on how to grow a bonsai tree from a seed as a beginner but wanted to delve into a little more detail.
First I reached out to my local botanical gardens who had this to say:
“Elms, Ficus and mapless are great beginner bonsai trees that can be grown from scratch in most conditions”
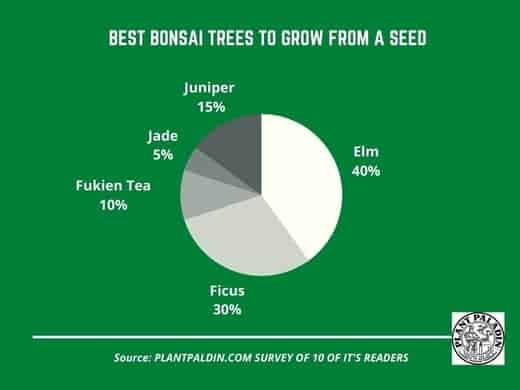
I also undertook a quick survey of 20 plant paladin readers and asked them their thoughts on what the best bonsai tree to grow from a seed was.
Here were the results:
What is misho?
Misho in bonsai means to grow a bonsai tree from a seed. This process teaches bonsai tree owners the exact skills of growing and maintaining bonsai and is recommended for all bonsai owners to undertake at least once to master the art of bonsai tree growing.
Alternatives to grow a bonsai tree from a seed?
Alternatives to grow a bonsai tree from a seed include growing a bonsai tree from a cutting. This drastically speeds up the process of new tree growth. Using bonsai growing kits can also be used as a viable alternative to misho.
How to speed up growing a bonsai tree from a seed?
To speed up the process of growing a bonsai tree from a seed, consider using larger cuttings from pre-grown trees. Bonsai grow kits are also commonly used and can drastically speed up the process of tree growing.
Growing bonsai trees from seeds that are also local sources will prevent you from needing to implement scarification or stratification techniques, further speeding up this process.
Is it hard to grow a bonsai tree from a seed?
To grow a bonsai tree from a seed is no more difficult than growing a regular from a seed. There are no specialty seeds that grow into bonsai trees. The difficulty comes with bonsai a few years after planting your seed when you need to wire, train and develop your bonsai.
This process can take a few years to master.
My top picks for the gear you will need!
So like I mentioned earlier, over the past three years of running PlantPaladin, hundreds of people have asked me for my recommendations on the best bonsai gear on the market.
Having spent thousands of dollars on bonsai items these past few years and tested at least 100 bonsai-specific products, I’ve listed my favorite products below – All of which I highly recommend and think you can get great value.
They can purchase directly by clicking the link to take them to Amazon.
Bonsai Tool Set: One of the significant challenges I’ve had is finding a toolset that was not only durable but didn’t break the bank. SOLIGT has recently developed a fantastic bonsai tool set that covers all the tools you need to trim, prune, and repot your trees. – You can grab it here.
Complete Bonsai Set: Many of you will want to grow your bonsai trees entirely from scratch, but finding the varicose seeds, pots, and other items in one place can be challenging. Leaves and Sole then have created a complete bonsai set that I’ve personally used that ticks all the boxes. You can grab it here.
Bonsai wire: The number of times I’ve run out of wire for my bonsai or purchased cheap bonsai wire that doesn’t do the job is embarrassing for me to admit. After a lot of trial and error, I found that using Hotop’s aluminum bonsai wire is one of the best options on the market. This can easily be used for both indoor and outdoor bonsai. You can grab it here.
This post was written by Fehed Nicass who has been passionate about bonsai for over 3 years.

