
This website is supported by its readers. If you click one of my links I may earn a commission. I am also a participant in the Amazon affiliates program and I will also earn a commission from qualified purchases.
One of the things I struggled with when growing and managing my bonsai was the harsh climate in the UK. As climate change increases, summers become more hot and harsh and winters become more severe and unstable. One solution I then found was to build a bonsai greenhouse to maintain a constant temperature year-round.
To build a bonsai greenhouse; decide on the size, placement, materials used, and bonsais you intent to keep in the greenhouse. Then assemble using wood and metal poles for a large greenhouse or a small shelving unit for a small greenhouse.
Ensure you use a shade covering to finish to protect your bonsai from the elements.
So what are the most common materials you can use to build a bonsai greenhouse from scratch? And what is the difference between large and small greenhouses? Keep reading to find out more!
Just a quick heads up, over the past three years of running Plantpaladin, hundreds of people have asked for product recommendations. As such, You can find my favorite indoor bonsai tree here (link takes you to Bonsaiboy), my favorite outdoor bonsai tree (link takes you to Bonsaiboy), or have a look at all the products I recommend here.
Decide on the size and placement of your greenhouse
Easily the most important aspect of building your bonsai greenhouse is going to be how big it will be and where it will go.
If you have a massive garden with loads of floor space then converting an old shed or buying a new shed with the specific purpose to create a greenhouse can work perfectly.
Using a shed in this way can help you store more than 15 bonsai, so if you have a large collection then this would be the way to go.
Alternatively, if you have fewer than ten bonsai trees, the best option would be to build a smaller greenhouse.
I find the best option for this would be to keep it in a garage where it can double up as a cold frame during the winter months. Using something then like a shelving unit is the perfect option.
To help explain a little more I’ve made a table below comparing large and small greenhouses to help you decide which one works best for you:
| Type of greenhouse | Advantages |
Disadvantages |
| Large |
|
|
| Small |
|
|
Now I’ll explain in a little more detail below, how to actually build both a large and a small greenhouse, but before then, let’s explore the other important steps that are required to build a bonsai greenhouse, regardless of size.
Get the right materials for your bonsai greenhouse
So you’ve decided on the size and placement of your bonsai, next up is to decide on the best materials needed.
For larger bonsai then I would recommend the following:
- A shed with a roof of some kind
- Waterproof/heatproof tarp that can be used to shade your plants
- A thermometer
- Tables and desks to place your bonsai collection.
My recommendation for large bonsai greenhouse materials
Now with a lot of these items, it can be super easy to get ripped off from common building merchants so luckily I’ve scoured the web and come up with the following items.
The Keter Manor 6×8 Shed (link takes you to Amazon) – Easily the best shed for growing bonsai in as it has more than enough internal room for you to move around as well as store your bonsai in. This shed is already waterproof and comes with a door that you can open to help with the sunlight.
20 x 30 grizzly tarp (link takes you to Amazon) – The perfect size waterproof tarp for any shed size that you will end up using. This can also help shade your plants in the hot summer months in your shed and comes with four holes in the corner if you want to nail the tarp in place.
Lirches Thermometer (link takes you to Amazon) – To be honest, any thermometer will do in this scenario but this is what I like to use just because it can also be used outdoors.
SHW standing desk (link takes you to Amazon) – Easily adjustable for your greenhouse allowing you to place your bonsais in with ease. Remote working warriors have a great breakdown of why this desk is so good.
I’d also potentially look into standing desk converters to give multiple heights of storage for your bonsais. Alternatively, you can use any wooden benches you have lying around for storage space for your bonsai
What materials do you need if you decide to build your bonsai from scratch?
If you are interested in building your shed completely from scratch – understand this will be a much more drawn-out process.
To do this you will need to invest in:
- Metal poles at least two meters high – At least 8 of these will be needed to make the frame of your greenhouse, however, you can opt for timber wood for a different option
- Waterproof tarp or plastic sheetings – this will keep the elements out of your greenhouse. My recommendation for plastic sheeting would be to look at Amazon. If you decide to plastic sheeting I would still keep the waterproof tarp over your greenhouse as a way of securing and maintaining temperature.
- Desks and thermometer – both of my recommendations for these can be found above however feel free to use your own.

What materials do you need if you are building a small bonsai greenhouse?
Now if you are interested in building a small bonsai greenhouse, you will need the following:
- Shelving units – This will be the structure that we will use to hold our bonsai
- Insulation foam panels – Easily the most important part of a bonsai greenhouse during the winter months
- 2×3 wood pieces of varying length – These will be used to help us create a door and a frame
- Door hinges – Again used to have an easy to open door in our greenhouse
- A fan – Used to temperature regulate our greenhouse and provide circulation
- An electronic thermostat – To help monitor the temperature of our bonsai greenhouse
- An electric heater – To help increase the temperature if needed
- A saw – Used to cut holes in your greenhouse if you have larger bonsai
- A drill – Used to drill in excess holes in your bonsai greenhouse for ventilation purposes.
My recommendations for small bonsai greenhouse materials
Again to help make the process a little easier I’ve come up with a few recommendations below on some of the best items for these:
Owens corning pink insulation panels (Amazon Link) – a fantastic option that won’t require you to trim them into size
My choice for a digital thermometer has to be the Govee temperature monitor (link takes you to Amazon), which not only monitors the temperature of your small bonsai greenhouse but also the humidity and wetness.
I’d have to go with an Ikea Kallax Bookcase (link takes you to Amazon) is easily a shelf unit that works best for small bonsai greenhouses which are durable and can be adjusted for a variety of sizes depending on your own needs.
Assemble your bonsai greenhouse
Now the fun stuff begins – it’s time to assemble our greenhouses.
As a lot of you will likely be building a small greenhouse let’s start with that:
How to assemble a small bonsai greenhouse
Quick note – you can find a lot more detail on this on my post around building bonsai cold frames.
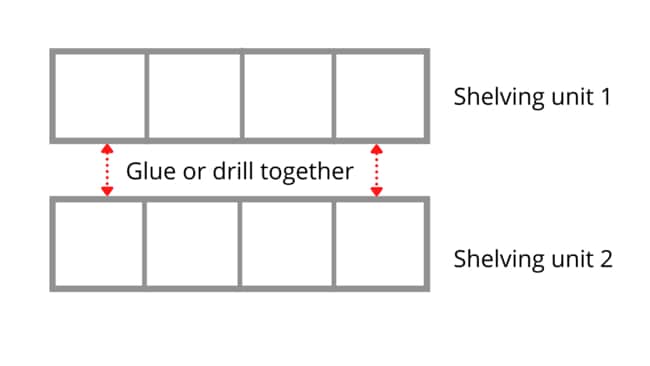
Glue your shelves together
Start building your Bonsai greenhouse by gluing one of your shelving units on top of the other.
Ensure that each segment of your shelving unit has enough room for each bonsai.
Now if your shelving unit does not have enough room for your larger bonsai to stand vertically without damaging themselves then you may need to saw a hole in between your units.
Cover your greenhouse in insulation foam
Now your structure is complete the next step is to cover your greenhouse in insulation foam.
Regardless of the insulation option you go for, you want to staple or glue this to the backsides and top of your bookshelf.
A trick I found is to double insulate the foam on the left and right sides of your structure, to avoid any cold air hitting your greenhouse that might come through your garage door.
Avoid however getting any insulation to the front for now
Build a door
To add a door then to your small bonsai greenhouse, get a panel of thin MDF wood or another lightweight wood, cut it to size so it fits the front of your greenhouse
We want to choose a lightweight material as anything too heavy will take a lot of effort to move consistently.
Then attach another plank of wood to the top of your shelving unit and attach a hinge to it. so your door can open and close.
You then want to cover your door in two layers of insulation.
Drill holes
One step that I have forgotten about, way too much in the process of making my bonsai greenhouse, is to ensure you have enough holes in the back of your greenhouse for ventilation and wiring (for a fan, heater, and thermostat).
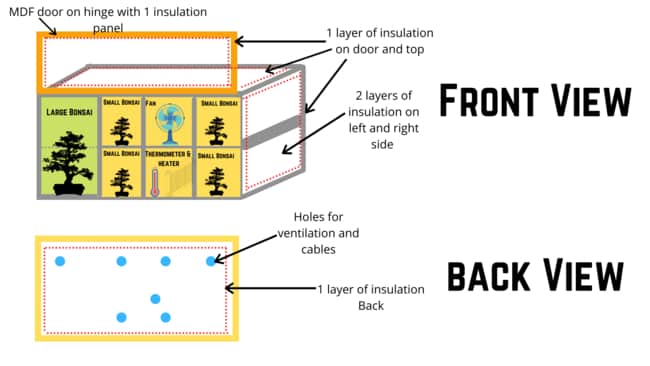
I like to drill or cut around 7 to 8 holes at various points in my greenhouse to ensure I’m covered.
How to assemble a large bonsai greenhouse
Now for those of you who are blessed with a large enough garden here is how to build assemble a large bonsai greenhouse
Move your shed into position
The first step is to move/ assemble your shed into position.
Most flat-pack sheds like the one I recommended earlier, come with instructions on how to do this.
A top tip however would be to leave your shed near a fence or wall as it will help give added protection against strong winds.
Cover in tarp
Covering your bonsai in a tarp is the next step, to protect from both rain and extreme sunlight
Cover your tarp then over your shed, ensuring that you still have access to the front door of the shed (you may need to cut a hole in the tarp for this)
You can then either staple the tarp directly on your shed or use using a hammer and metal prongs, prong the tarp into the grass like you would a tent.
Drill a hole for enough sunlight and cables
If your shed does not have power or you have covered all the windows and doors, you must drill enough holes in for ventilation so your bonsai still get air and you can power any heating devices if need me.
Around 12 -15 holes across various points of your shed will work best.
Avoid covering any windows
Whilst you might be using the greenhouse to protect your bonsai from the heat in the summer months it’s super important that you have enough sunlight coming in to feed your bonsai.
You see without light your bonsai won’t be able to use the light for food via photosynthesis.
Place your desks, heaters, and thermometer
Finally, move your desks or benches into position in your shed.
You want to keep no more than two large bonsai on one desk to give them enough air and moisture around them but consider using standing desk converters to maximize your space.
Then simply add any heaters, thermometers, or fans to your shed to help maintain temperature if need be.
How to build a large bonsai greenhouse from scratch
So if you are feeling more adventurous, you can DIY the whole process yourself without using a shed as a foundation.
If this is the case it is up to you to design exactly how you want your large greenhouse and the materials and designs will be up to you entirely.
A fantastic video I found was from the ‘I like to make stuff’ Youtube channel which you can find here.
Place your plants
So your bonsai greenhouse has now been built.
We then need to carefully place our bonsais into position.
We want to make sure each bonsai has enough access to the air and light around them whilst maximize the space we have.
My recommendation then is to place no more than two bonsai per bench or desk in your greenhouse.
Manage the temperature
Finally comes managing the temperature.
The whole point of building a greenhouse for bonsai is so that we can maintain the same temperature year-round without having to worry about changes in climates.
The best thing to do then would be to install a thermometer, fan, and heater into your greenhouse, all of which can be easily accessed by you.
Then if you find your greenhouse is getting too warm or cold for your bonsai species you can easily change this.
What’s even better is that by doing this you can essential winterize your bonsai at the same time as building a bonsai greenhouse.
Now there are many different FAQs that people have when it comes to bonsai and greenhouses so I’ve attempted to answer them below
What plants benefit from bonsai greenhouses the most?
Tropical bonsai species or plant species that have been imported recently from warm climates such as the Middle East are the best suited to be kept in greenhouses during the winter months. Some examples include Brazilian rain tree, Ficus, and Fukien tea.
Why do people build bonsai greenhouses?
Some bonsai owners opt for keeping bonsai greenhouses as a way of maintaining the temperature for their bonsai plants year-round. This is particularly effective when managing plant species that are more susceptible to changes in temperature such as tropical species like Ficus.
What temperature should you keep in your bonsai greenhouse?
80 to 85 degrees Fahrenheit or 26 to 29 degrees Celsius are the best temperatures to keep a greenhouse for bonsai year-round. That being said this depends greatly on the species of plant with most bonsai species needing the cold winter to naturally replenish.
Should you build a bonsai greenhouse?
Keeping your bonsai in a greenhouse is only advisable for certain tropical species of bonsai during adverse weather conditions. Bonsai will usually be able to adapt easily to their surroundings and so greenhouses are not usually necessary.
That being said if you find that the climate you are in, changes rapidly day to day, then greenhouses make can make for a good option.
My top picks for the gear you will need!
So like I mentioned earlier, over the past three years of running PlantPaladin, hundreds of people have asked me for my recommendations on the best bonsai gear on the market.
Having spent thousands of dollars on bonsai items these past few years and tested at least 100 bonsai-specific products, I’ve listed my favorite products below – All of which I highly recommend and think you can get great value.
They can purchase directly by clicking the link to take them to Amazon.
Bonsai Tool Set: One of the significant challenges I’ve had is finding a toolset that was not only durable but didn’t break the bank. SOLIGT has recently developed a fantastic bonsai tool set that covers all the tools you need to trim, prune, and repot your trees. – You can grab it here.
Complete Bonsai Set: Many of you will want to grow your bonsai trees entirely from scratch, but finding the varicose seeds, pots, and other items in one place can be challenging. Leaves and Sole then have created a complete bonsai set that I’ve personally used that ticks all the boxes. You can grab it here.
Bonsai wire: The number of times I’ve run out of wire for my bonsai or purchased cheap bonsai wire that doesn’t do the job is embarrassing for me to admit. After a lot of trial and error, I found that using Hotop’s aluminum bonsai wire is one of the best options on the market. This can easily be used for both indoor and outdoor bonsai. You can grab it here.
This post was written by Fehed Nicass who has been passionate about bonsai for over 2 years. He currently resides in the UK and works in sales.