
This website is supported by its readers. If you click one of my links I may earn a commission. I am also a participant in the Amazon affiliates program and I will also earn a commission from qualified purchases.
So recently I’ve been experimenting with thickening the trunk of my bonsai tree. It’s worked out pretty well but one of the problems I’m now facing is that there is no movement in the trunk of my bonsai. So how exactly do you bend the trunk of a bonsai tree? And what are some good bonsai trunk bending techniques?
To bend the trunk of a bonsai, weaken the trunk by making two, one-centimeter gashes in the direction you want the trunk to bend. Then wrap the bonsai in copper wire in its new bent position, and anchor the wire to the roots or pot of the bonsai.
Bonsai trunk chopping can also be used as a viable option to bend a bonsai trunk.
So what are the advantages and disadvantages of bending a bonsai trunk? Are there any other bonsai trunk bending techniques? Keep reading to find out more.
Just a quick heads up, over the past three years of running Plantpaladin, hundreds of people have asked for product recommendations. As such, You can find my favorite indoor bonsai tree here (link takes you to Bonsaiboy), my favorite outdoor bonsai tree (link takes you to Bonsaiboy), or have a look at all the products I recommend here.
Bonsai trunk bending techniques
Whilst bending branches is a relatively straightforward process, bending the trunk of a bonsai tree can be a little more complicated.
This is mainly because the trunk of a bonsai tree’s purpose is to provide structure, providing nutrients to the leaves and branches.
As such the trunk of a tree is often incredibly rigid and tough.
Luckily however I’ve been experimenting in bending the trunk of my bonsai trees, visited my local botanical gardens to get some expert advice, and even asked 20 plant paladin readers on the best bonsai trunk bending techniques.
To bend the trunk of a bonsai then:
- Come up with a design
- Ensure it is the right time of year
- Weaken the trunk slightly
- Cut into the trunk of your bonsai
- Add sealant
- Use a guy wire to hold the trunk in place
- Apply copper wire to secure the new position
- Water and maintain regularly
- Remove the copper wire after 4 months
- Repeat the process
Let’s explore these steps in more detail individually.
Come up with a design
Before you even think about bending the trunk of your bonsai tree it’s important to have an idea of what you would like the bend in the trunk to look like.
The degree of the bend will vary depending on the exact style you are looking for.
For example, bonsai tree styles such as sumo bonsai or formal upright styles (Chokkan) will require very few bends when compared to styles such as cascading bonsai (Kengai) or an informal upright bonsai style (Moyogi).
| Bonsai tree style | The severity of trunk bend |
| Broom style | None |
| Formal upright | None |
| Informal Upright | Medium |
| Sumo | None to mild |
| Semi-cascade | Severe |
| Cascade | Severe |
| Slating bonsai | Mild |
| Literati | Mild |
| Windswept | Medium |
| Double trunk | Medium |
| Forest | Mild |
| Multi-trunk | Severe |
As such, it’s always beneficial before you start working on the trunk of your tree to work out the severity of the bends you will need your trunk to have.
I like to do this just by drafting something roughly with a pen and paper.
It’s also worth keeping in mind that severe bends in the trunk of a bonsai, such as creating a severe s-shaped trunk will require following the techniques in this post multiple times and can take a significant amount of time to complete.
Ensure it’s the right time of year
The best time of year to bend the trunk of a bonsai tree is mid to late summer. This is because a lot of tree species will have grown new leaves and roots and will be at their strongest point during the year. Avoid bending the trunk of a bonsai in late fall or winter.
A lot of bonsai experts bend the trunk of their trees during the winter months in an attempt to fool the tree and mitigate any damage caused by the bend.
The sad truth however is that should you try to bend the tree during the winter – your bonsai won’t have enough time to manage the damage caused or heal properly.
This is why we aim to create any bends during the spring – when our bonsai have done the most growing and are at their strongest position.
This will also work particularly well if you are trying to bend the trunk of a deciduous tree species which has the habit of bleeding sap if you were to bend the trunk in early spring.
To help summarize I’ve created a table below:
| Bonsai tree type | When to bend the trunk |
| Deciduous | Late summer (July/August) |
| Coniferous | Late summer (August/September |
Weaken the trunk slightly
So now you what time of year to start this process, we need to weaken the trunk of our trees slightly.
Bonsai trunks and tree trunks are notoriously tough and so trying to bend these if they are left as they are will be very difficult.
Slightly weakening the trunks then will make them more malleable and easier to manage.
This can be done in a few ways such as leaving a bonsai in the sun for a day without water to wrapping in wet raffia to make the branches easier to move.
For my money, the best method is just to use a bonsai trunk splitter such as this one you can grab from Amazon and crunch the trunk of your bonsai in 2 to 3 places.
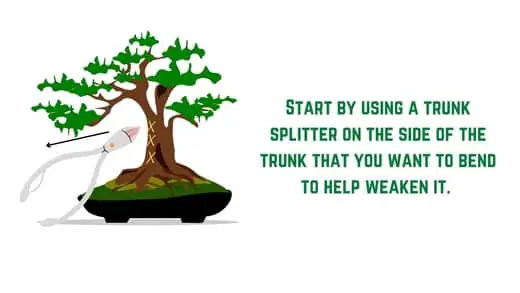
Be sure not to go all the way through the tree – all we want to do is weaken the tree slightly.
Cut into the trunk of your bonsai
The trunk will now have been weakened and so the next step we need to follow is to start the bending process.
To do this, decide on the direction you would like the trunk to bend.
Then make a cut about 1cm wide that goes about ¾ deep into the trunk of your tree.
Repeat the process until you have enough cuts that the trunk bends in the direction you want it to – to test this out simply compress the cuts together and you will get a good idea of how the bends look.
The number of chunks you make will vary from the size of your bonsai.
This can be a difficult step to follow as if you make too many slits in your bonsai for the size of your tree, you can end up severely damaging the plant.

Hopefully, then the table below should help give an idea of the number of slits that will be required spending on the size of the tree:
| Classification | Size inches | Size Centimeters | Hand size | General size | Number of cuts needed for trunk bend |
| Keshitsubo | 1 to 3 inches | 3 to 8 centimeters | Fingertip | Tiny | 1 |
| Shito | 2 to 4 inches | 5 to 10 centimeters | One-hand | Tiny | 1 |
| Mame | 2 to 6 inches | 5 to 15 centimeters | One-hand | Small | 1 |
| Chohin | 5 to 8 inches | 13 to 20 centimeters | One-hand | Small | 1 |
| Kumono | 6 to 10 inches | 15 to 25 centimeters | One-hand | Small | 1-2 |
| Katade-mochi | 10 to 18 inches | 25 to 46 centimeters | Two-hand | Medium | 2 |
| Chiu or Chumono | 16 to 36 inches | 41 to 91 centimeters | Two-hand | Medium | 2-3 |
| Dai or Omono | 30 to 48 inches | 76 to 122 centimeters | Four-hand | Large | 2-4 |
| Hachi-uye | 40 to 60 inches | 102 to 152 centimeters | Six-hand | Large | 3-4 |
| Imperial | 60 to 80 inches | 152 to 203 centimeters | Eight-hand | Large | 4-8 |
Add sealant
Before the cuts we have made are secured, we need to do some work to avoid our tree getting infected by fungal infections.
For best results then, t this stage, I like to add a water sealant or cutting paste to help with the healing process of the tree.
Additionally, if you have the time I would also consider wrapping the entirety of the trunk section where the cuts were made in waterproof grafting tape to prevent further damage.

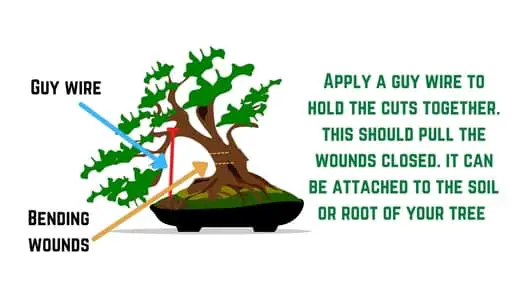
Apply a guy wire
Now a lot of the bending work has been done the next few steps will help secure and keep the bend in place.
The next step then will be to apply a guy wire to our bonsai.
This will help hold and anchor the bend in place stopping your tree from moving around during the wiring and healing process.
Failing to apply a guy wire then will cause your tree and these cuts to move around too much – causing the tree to not heal properly.
To apply a guy wire, loop a single 1.5mm to 2mm thick copper wire around the bend of your tree and anchor it to the base of your bonsai pot.
You can also anchor this wire to any jin, nebari, or secure items to hold this guidewire in place.
Bonsai tourniquets can also be applied at this stage, however, can be a little complicated to use when compared to guy wires.
Avoid using aluminum wiring as that can prove to be too flexible and can cause your bonsai to still move around.
Apply copper wire to secure the new position
Now the guy wire is anchoring our bend, we want to apply copper wire to secure the bend of our tree.
To do this, wrap copper wire that is about 1/3rd the size of the trunk of your tree around the trunk of your tree roughly at a 45-degree angle.
Hold your trunk in its new position and ensure that you tighten the copper wire in place.
This should hold the trunk in its new position.
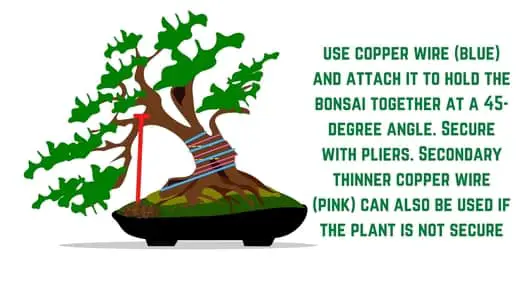
If your trunk is particularly strong you may need to apply a secondary thinner, copper wire (around 1 to 2 mm) to further hold the trunk in its new bent position.
Water and maintain regularly
Now that your tree trunk has been wired correctly it shouldn’t move.
It’s important during this weakened state that you pay extra close attention to the health of your bonsai.
This means watering your trees thoroughly should the topsoil be dry – ideally with rainwater which has several benefits.
Following good aftercare works well and regularly checking your bonsai for signs of insect infestation such as:
Ensure your bonsai also gets enough sunlight as well as keep it at the right temperature for its species.
All of these are the key fundamentals of keeping a bonsai tree but need to be followed after any pruning such as trunk bending has taken place.
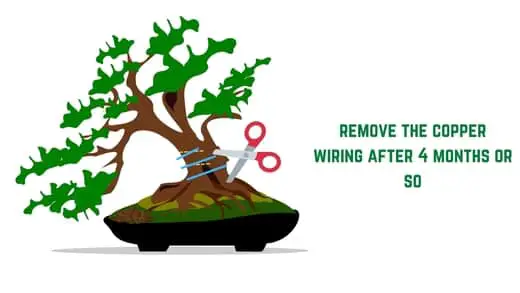
Remove the copper wire after 4 months
For most bonsai, after about 4 months the cuts you made will have been healed and your bonsai will have been bent into position.
At this stage, you can then remove the copper wire and guy wire that was holding the tree together.
Use a sharp pair of scissors or shears and carefully remove the wire and tape that was applied earlier on.
4 months is typically the sweet spot for most species but be sure to gauge your own plant’s growth and healing rates – no one knows your bonsai better than you so be sure to make this judgment call for yourself.
Repeat the process
It’s important to keep in mind that often, several trunk bends will be required to get your bonsai looking exactly the way you would like it to.
Slow and steady typically always wins the race when it comes to bonsai and so be patient and aim to do multiple small bends.
You’ll find that your tree will be a lot healthier than trying to cram in 6 or 7 trunk bends in one sitting.
Alternatives to copper wire trunk bending
Copper wire, whilst a fantastic tool, can sometimes be a little damaging toward bonsai.
Whilst the above method is the most common and best technique for bonsai trunk bending, there are a few alternatives.
The two alternative methods then are:
- Using Raffia
- Bonsai trunk chopping
How to use raffia as a bonsai trunk bending technique
Raffia is a fibrous organic material that has the elasticity and strength of copper wire, without any of the potential damage that copper wire can cause.
What’s even better is that the general method of using raffia is the same as using copper wire – just replace the wire with the material and you should be good to go.
Bonsai trunk chopping as a bonsai trunk bending technique
Another common method used in bonsai trunk bending techniques is the bonsai trunk chop method.
This method requires you to chop the trunk of a bonsai either above or below the branch of your tree.
During the healing process, the trunk will grow back at a new angle anding a significant bend to a tree.
This method is one of the oldest methods used for trunk bending however it can be quite complicated for newbies to follow.
If done incorrectly it can also cause significant damage and takes a lot of patience and many years to see the results as you will often be waiting on the tree to heal before you see its results.
Bonsai trunk chop method to bend bonsai trunk?
As this method is a little complicated, I’ve written an entire post on it here.
To summarise the key steps, however:
- Make a sharp cut on the tree trunk, below any branches
- Add the cut paste to protect the new wound
- Wait a few months for the new branches to grow out
- Decide on the new leader primary branch that will become the new trunk
- Carve the reminder of the trunk into the new primary leader to create a bend.
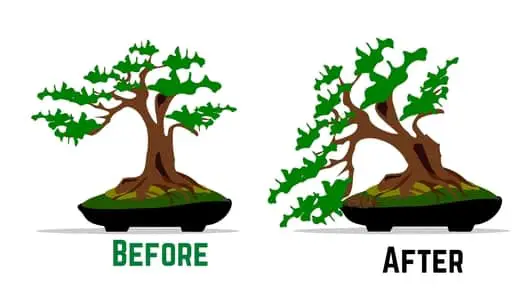
Why do people bend the trunk of a bonsai?
Bonsai trunk bending is undertaken to speed up the time required to create bends in trunks. Styles such as Moyogi or kengai can take decades to achieve naturally so trunk bending can speed up the process of creating aesthetically pleasing trees in a short amount of time.
What types of trunks do bonsai trunk bending techniques work best for?
Slender, thinner tree trunks will be easier to bend and manipulate during the trunk bending process than thicker wider trunks. Sumo style bonsai for example would need significant work to achieve trunk bending.
How long does trunk bending take?
Bonsai trunk bending usually takes 4 and 6 months to achieve for a medium-sized tree. The larger the tree the longer the healing process, with some imperial-sized bonsai taking upwards of a year to heal correctly.
Ensure any bonsai trunk bending technique is only undertaken during the growing months to limit the damage.
What bonsai tree styles require trunk bending techniques?
Informal upright (Moyogi), Cascade bonsai (Kengai), and semi-cascade bonsai (Han-Kengai) are all bonsai tree styles that require bonsai trunk bending to achieve. Sumo bonsai, formal upright and broom styles do not require trunk bending.
All bonsai styles can be achieved without trunk bending – they will however take much longer to achieve should they be left to grow naturally.
What tree species work best for bonsai trunk bending techniques?
Jade bonsai works best for trunk bending. This is because their branches and trunks are full of water and easy to move. Most deciduous and coniferous species are also easy to use for trunk bending with Elms, Acres, and Junipers all being the easiest.
Advantages and disadvantages of bonsai trunk bending techniques?
The main advantages of trunk bending are:
- Allows you to create significant bends in a tree trunk during a short amount of time
- Teaches you skills necessary for all aspects of bonsai
- Allows you to achieve styles your tree would not be able to grow in naturally
The main disadvantages of trunk bending are:
- Easy to damage with scars often being left over
- Can be easy to get wrong with some potential to kill your tree
- Weaknesses the tree and makes it more susceptible to insect infestations and fungal infections.
Wrapping things up
So now you know how to bend the trunk of a bonsai, I wanted to get some further expert advice on the topic.
As such I got in touch with my local botanical gardens and asked them their thoughts on bonsai trunk bending techniques – here is what they said:
“Bonsai trunk bending is an important aspect of bonsai keeping and can add real style to trees”
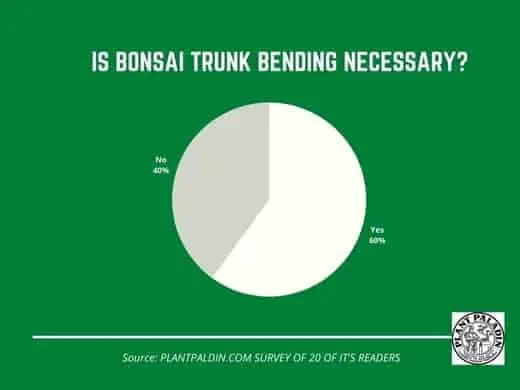
I also asked 20 plant paladin readers on their thoughts on if trunk bending is necessary for a good bonsai tree here is what they said:
My top picks for the gear you will need!
So like I mentioned earlier, over the past three years of running PlantPaladin, hundreds of people have asked me for my recommendations on the best bonsai gear on the market.
Having spent thousands of dollars on bonsai items these past few years and tested at least 100 bonsai-specific products, I’ve listed my favorite products below – All of which I highly recommend and think you can get great value.
They can purchase directly by clicking the link to take them to Amazon.
Bonsai Tool Set: One of the significant challenges I’ve had is finding a toolset that was not only durable but didn’t break the bank. SOLIGT has recently developed a fantastic bonsai tool set that covers all the tools you need to trim, prune, and repot your trees. – You can grab it here.
Complete Bonsai Set: Many of you will want to grow your bonsai trees entirely from scratch, but finding the varicose seeds, pots, and other items in one place can be challenging. Leaves and Sole then have created a complete bonsai set that I’ve personally used that ticks all the boxes. You can grab it here.
Bonsai wire: The number of times I’ve run out of wire for my bonsai or purchased cheap bonsai wire that doesn’t do the job is embarrassing for me to admit. After a lot of trial and error, I found that using Hotop’s aluminum bonsai wire is one of the best options on the market. This can easily be used for both indoor and outdoor bonsai. You can grab it here.
This post was written by Fehed Nicass who has been passionate about bonsai for over 3 years.