
This website is supported by its readers. If you click one of my links I may earn a commission. I am also a participant in the Amazon affiliates program and I will also earn a commission from qualified purchases.
One of the things I struggled with when I first started growing bonsai was learning to thicken, shape, and taper the trunk of my trees. The process was frustrating, but luckily after a few years, I managed to master the technique. So how exactly do you build a bonsai trunk? And what is bonsai trunk development?
To develop the trunk of a bonsai, start by growing out a sacrifice branch to thicken the size of the trunk. Then add taper to the trunk either by trunk chopping or using a tourniquet. Finally, add taper to a trunk by removing small chunks from the trunk and wiring the trunk in place.
Developing a trunk from scratch is a relatively long process with each stage of the growing, shaping, and tapering process each taking a few years.
So what are the advantages and disadvantages of bonsai trunk development? And what bonsai species work best for bonsai trunk development? Keep reading to find out more!
Just a quick heads up, over the past three years of running Plantpaladin, hundreds of people have asked for product recommendations. As such, You can find my favorite indoor bonsai tree here (link takes you to Bonsaiboy), my favorite outdoor bonsai tree (link takes you to Bonsaiboy), or have a look at all the products I recommend here.
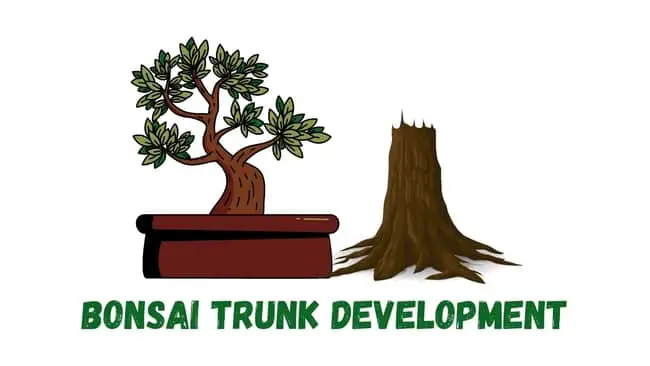
Bonsai trunk development
Bonsai tree trunks are essential for the health, wellbeing, and nutrient flow of your tree. They also provide a lot of support for your tree.
For us bonsai owners, bonsai tree trunk development is essential.
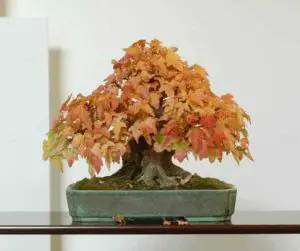
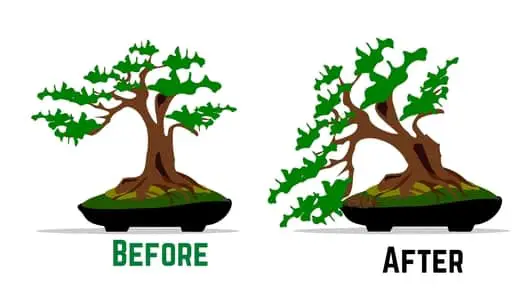
A bonsai trunk that is developed well, can give the appearance of a natural tree and can make a bonsai look a lot older than it is.
Thicker, more developed trunks then tend to be more aesthetically pleasing and typically perform better in competitions.
All good bonsai tree trunks then have 3 main parameters to them including:
- A thick sized trunk
- A nice shape with movement
- A gradual taper
It’s worth mentioning that not all bonsai tree styles will have all 3 of these in equal proportions.
A larger sumo bonsai style for example will perform better with a wide thick trunk and a gradual taper, without a lot of shape or movement in them.
That being said, developing the trunk of a bonsai is essential for almost all trees over time.
Whilst the process can be challenging, the good news is that I’ve got in touch with a few experts, visited my local botanical gardens, asked 20 plant paladin readers, and succeeded (and failed many, many times) and bonsai trunk development.
I found then that the following steps work best to develop the trunk of a bonsai:
- Ensure it’s the right time of year
- Decide on your bonsai style
- Decide on the bonsai species
- Use sacrifice branch to grow out the trunk thickness
- Add taper to the tree by trunk chopping
- Shape the trunk
Let’s explore these in more detail.
Ensure it’s the right time of year
Before any bonsai trunk development work begins, like any work on a bonsai tree you must take note of the season.
Developing the trunk of a bonsai tree, regardless if you are working on increasing the thickness, shape or taper are all very intense projects.
If they are done at the wrong time of year, such as during the winter months, your bonsai might not heal correctly, leaving it more susceptible to things like dead branches, fungal infections, pest infestations, and in worst-case scenarios result in the death of your tree.
The best time of year to work on bonsai trunk development will be early to mid-spring; March to Mid-April. Trunk development can be worked on up until the early summer. Avoid any trunk development in the fall.
Whilst deciduous species work best in the early spring, coniferous species such as junipers and Scots Pines work best when being modified near the end of the summer due to the amount of sap in them.
Decide on your style
Bonsai trees come in a wide variety of styles including:
- Sumo
- Moyogi
- Upright
- Broom
- Slating
- Cascade
- Semi-cascade
- Windswept
And many more.
As such, the degree of shape, taper, and size of the trunk will vary depending on the style you opt for.
A good example of this is to compare sumo bonsai styles with a cascade bonsai style.
Sumo bonsai trees by their nature have smaller wider trunks meaning they will need more of a focus on the thickening of a trunk and less of a focus on the shape and movement of the trunk.
Cascade bonsai however have a very strong bend in them meaning the shape and taper will be far more important than deciding on the thickness of the trunk.
Knowing this before you start any trunk tapering will save you a lot of time.
I find then that writing down exactly what style of bonsai you want to design on pen and paper can work best.
Decide on the bonsai species
So now you know the style and design of the bonsai you want to go for the next step is to decide on the bonsai species you will use for the trunk development.
Now it’s likely you are reading this that you already have a tree, so feel free to skip ahead to the next step.
If however, you are still on the fence as to what tree to buy, I’d definitely consider investing in a tree species that is beginner-friendly.
II found that conifers such as elms, ficus, and succulents such as Jades to be the most low maintenance trees to opt for.
These species allow you to make mistakes with them which will be common when developing bonsai trunk and can take a lot of damage without severe injury,
Jade bonsai, in particular, holds a lot of water in its branches and leaves making its trunk easier to maneuver.
I would avoid species as a beginner that has hardwood such as hickory which can be notoriously difficult to bend.
Store-bought or plating forms seedling
Another thing to consider is if you will be using a store-bought tree that is already a few years old or if you are growing your bonsai from scratch from seedlings or cuttings.
I would recommend for bonsai trunk development, using a store-bought tree, as the amount of time it takes to grow a bonsai from scratch can be significantly longer.
Use a sacrifice branch to grow out trunk thickness
Now the fun begins!
It’s finally time to start bonsai trunk development and In my opinion, there is no better place to start than by growing out the thickness of your bonsai trunk.
Now the good news is that there are many different methods to growing out a thick bonsai trunk including:
- Planting your bonsai in the ground
- Merging two bonsai trunks
- Splitting the trunk of your bonsai
- Using a tourniquet to restrict the nutrient flow of your tree
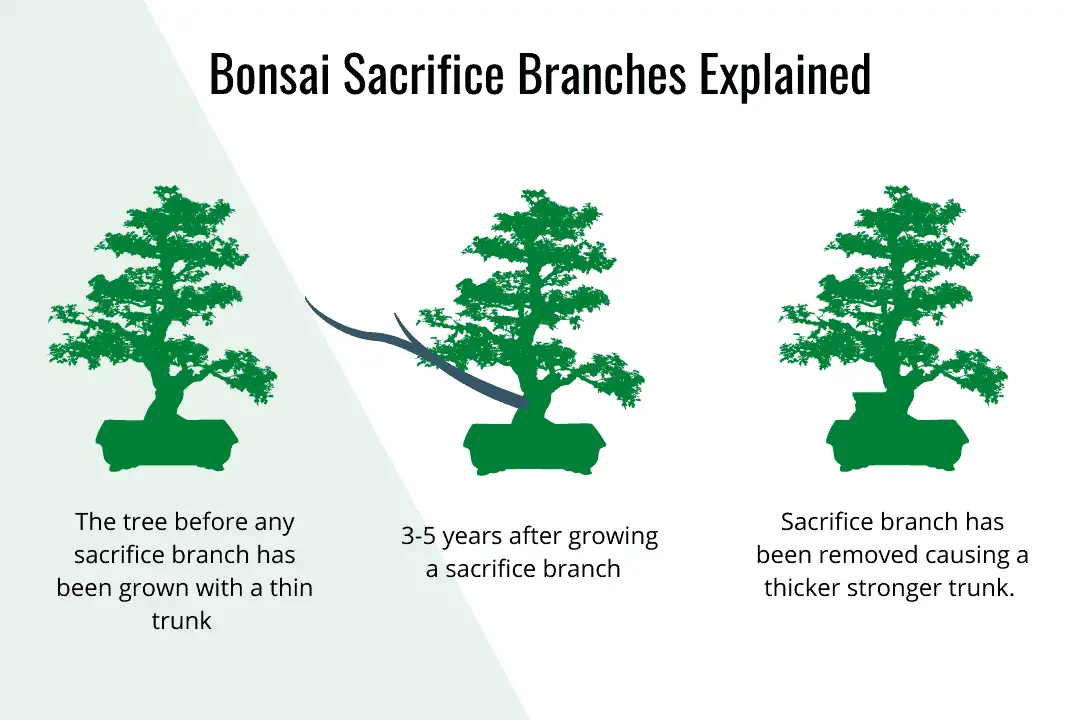
For my money, however, easily the best method is to grow out a sacrifice branch.
A sacrifice bonsai branch is a branch that has been left to grow out of the side or back of your tree and has not been pruned back like the other branches.
As time goes on, as the sacrifice branch increases in size, so will the thickness of the trunk the branch is connected to.
How to grow out a sacrifice branch for bonsai trunk development?
To grow out a sacrifice branch select a branch that is lower down the tree – this will also help with creating a taper and will evenly distribute the thickness of your tree.
Branches typically on the side or back of a bonsai work best for a sacrifice branch – avoid any branches that are too high up or branches that are at the front of the tree.
Once selected, do not prune chop, or wire this branch – the sacrifice branch must be left to grow.
As such, continue to water and maintain the health of your tree.
Let the sacrifice branch grow out for 3-5 years (this timescale often works best for most bonsai species).
Then once this period has been completed the trunk should be significantly larger.
You can then use a sharp pair of bonsai shears to remove the sacrifice branch and move on to the next step.
Bonus tip for sacrifice branches
Growing out a thick tree trunk from sacrifice branches takes time so if you want to speed up the process, you can consider growing out multiple sacrifice branches.
This should speed up the time it takes to grow a thick bonsai tree trunk.
Another fantastic option to speed up the process of bonsai trunk development thickness is to just let your tree grow – free from pruning or defoliating for a 3 to 5 year period.
This will enable to root structure to also grow and will give your tree several sacrificial branches.
Just ensure if you follow this method you only use it on trees that have already matured into bonsai trees and won’t regress to normal trees.
Add taper to the tree
So after a few years of growing out a sacrifice branch, the trunk of your bonsai should have significantly increased its thickness.
One problem however you might friend is that the entirety of the trunk is thick with no real taper.
Whilst this is good for broom-style bonsai, the majority of styles need some form of a taper.
The next step then in bonsai trunk development is to introduce a gradual taper to a tree.
Bonsai trunk taper is simply having a tree trunk that is thick at the bottom and gradually thins out.
How to add taper to a bonsai trunk?
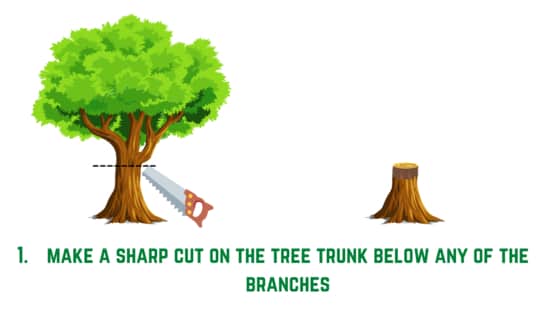
Now whilst there are many methods to improve the taper of a bonsai trunk, I found that easily the best method is to invoke bonsai trunk chopping.
Bonsai trunk chopping is the process of chopping, hacking, or reducing a bonsai trunk to promote new growth.
The trunk can be chopped either above or below the branches of your tree.
When new branches of the tree will grow out, a new leader primary branch is selected that will be merged into the trunk.
As this new branch will be younger it will have more of a taper than traditional trunks.
This process can be quite hard to follow so I’ve written a post about it you can check out here.
Alternatively, follow the steps in the images below to create a successful taper.
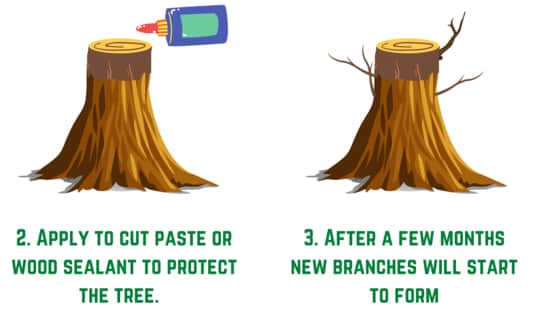
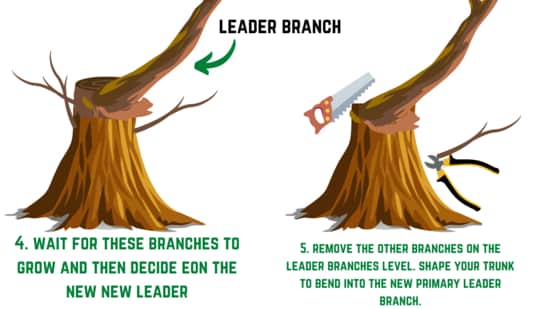
In its entirety, this process can take 1 to 3 years for the new branches and growth to occur so you will need to be patient.
There is also a chance that your trunk may not grow back should you get this process wrong so feel free to check out some of the alternatives I’ve listed below to help increase taper.
Add shape and bends to your trunk
So now a lot of the hard work has been completed you should have a trunk that is thick but also has a nice taper.
The next step to take your bonsai trunk development to the next level is to add shape or bends to the trunk of your tree.
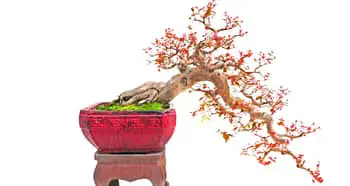
Some bonsai styles such as Informal upright style (Moyogi) or Cascade bonsai style (Kengai) have severe bends in them.
Whilst these bends can be created naturally – I think a lot of you reading this don’t want to wait around a couple of decades to create these bends naturally.
How to add shape and bend tin bonsai trunk development?
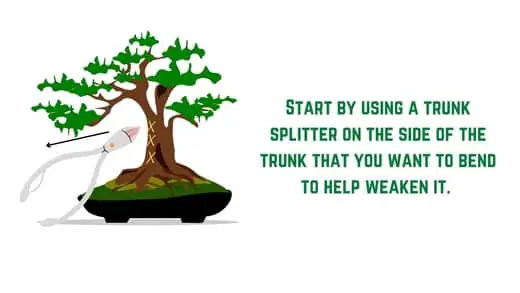
To add shape and bends into a bonsai trunk I found the best method would be to use the bonsai trunk bending technique.
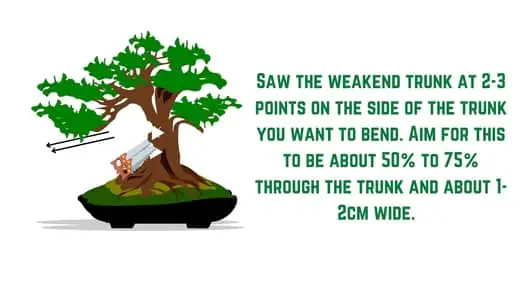
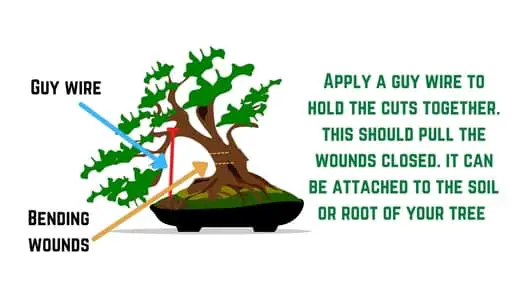
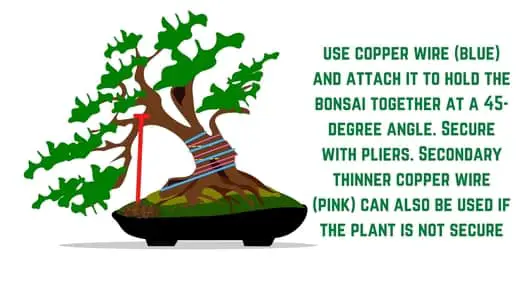
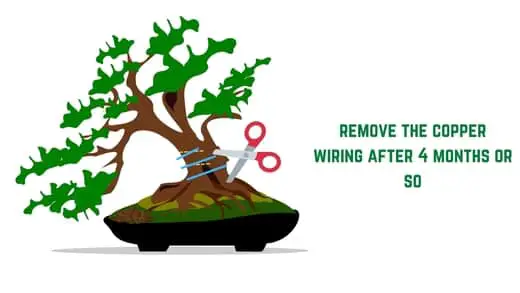
This technique requires you to:
- Weaken the trunk of your tree slightly
- Cut about 50% to 75% of the way through the trunk of your tree in the direction you would like it to bend
- Add sealant to protect the new wound
- Apply a guy wire to anchor the bend
- Apply copper wire to hold the bend and tree in place
- Let the tree grow for between 4 months and 1 year.
The idea with this technique is as the tree grows and the wounds heal and merge it will create natural bends in the trunk of the bonsai tree.
In my opinion, there is no better option for creating strong bends in a bonsai.
Just keep in mind however that should you want to create an s-shaped bonsai, you might need to repeat this process a few times to get all the bends in your trunk.
Again this process can be hard to follow so hopefully the images below will help.

For more information on trunk bending – check out my bonsai trunk benign post here.
Alternatives methods for bonsai trunk development
So the above methods of using a sacrifice branch, bonsai trunk chopping, and bonsai trunk bending are the best trunk development methods for adding size, taper, and shape to your bonsai trunk.
As with all bonsai trunk development techniques, however, they have their advantages and disadvantages.
As such I wanted to give a few alternative methods for bonsai trunk development.
These include:
- Growing a bonsai in the ground
- Trunk merging
- Trunk Splitting
- Bonsai tourniquets
Let’s explore these in more detail:
Growing a bonsai in the ground for trunk development
One of the oldest methods of developing the trunk of a bonsai – especially in larger-sized bonsai trees such as imperial trees is to grow the bonsai in the ground.
As most of us grow our bonsai trees in pots (and often expensive, shallow pots with a lot of drainage holes) this limits the amount of growth our trees can undertake.
By growing a bonsai tree in the ground, the tree will not be limited to the soil in a confined pot and will be able to absorb all the nutrients and.
A lot of bonsai owners will plant their trees in the ground for a year or two to maximize the growth during the summer months.
Growing a bonsai tree in the ground will be especially impactful in fast-growing trees – particularly elms.
For a full list of fast-growing trees, I’ve created a table below:
| Bonsai species | Growth type | Average growth per year |
| Chinese Elm | Fast | 12 to 36 inches |
| Juniper | Moderate | 5 to 12 inches |
| Jade | Slow | 2 to 5 inches |
| Maple | Fast | 12 to 36 inches |
| Fukien Tea | Slow | 2 to 5 inches |
| Ficus | Fast | 12 to 36 inches |
| Wisteria | Slow | 2 to 5 inches |
| Cotoneaster | Moderate | 5 to 12 inches |
| Pine (most varieties) | Fast | 12 to 36 inches |
| Azalea | Slow | 2 to 5 inches |
Disadvantages of growing a bonsai in the ground
Whilst growing a bonsai in the ground will have fantastic results at increasing the size of the trunk of your tree, there are some significant downsides to it.
Firstly, it can be very easy to overwater a bonsai if it is kept outdoors – mainly due to the excess rainwater and groundwater these trees will receive.
Secondly, as they will be planted in the ground, it will take a lot of effort to move these trees in the shade, especially if they are getting too much sunlight.
Whilst most bonsai trees need plenty of direct sunlight, getting more than 8 hours of direct sunlight per day, especially in the summer months can cause burns or damage your trees.
Finally, planting a bonsai in the ground will also attract unwanted pests and bugs such as aphids, slugs, spider mites, scale, and caterpillars, as well as from other animals such as foxes, squirrels, birds, and frogs to name a few.
If you are interested then in planting your bonsai in the ground I would recommend having a look at my post here.
Bonsai trunk merging for bonsai trunk development
If you decided to go down the route of growing and thickening your bonsai tree from scratch then I found this method to be especially useful – especially in seedlings or cuttings.
The general process is that you plant several seedlings/cuttings in one bonsai pot together around a metal pole or mesh.
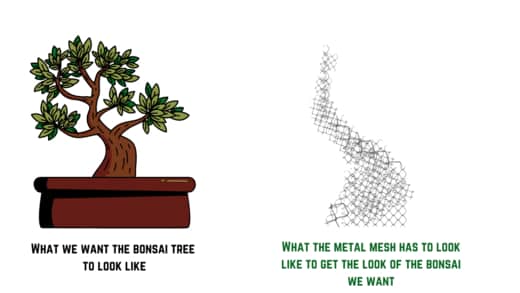

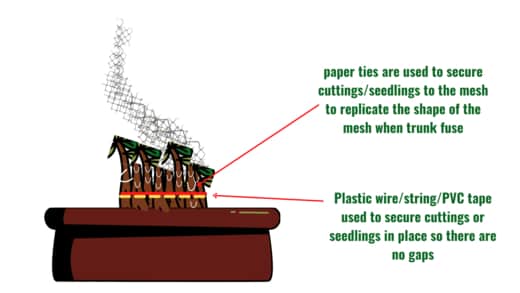
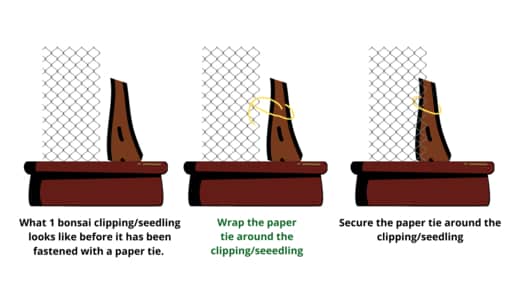
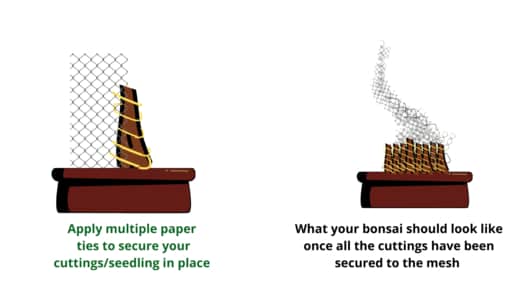
You then gently attach these with copper wire/ paper ties.
Water and care for these seedlings as you would normally and over time these seedlings will merge to form one giant trunk.
I’d also recommend having a look at my post on bonsai trunk merging here.
Bonsai trunk splitting for bonsai trunk development
Splitting the trunk of your bonsai is a fantastic option to increase the size of your tree.
Just be warned however it can be incredibly dangerous if done incorrectly – more so than bonsai trunk chopping.
As such I would only recommend doing this if you have a few years of experience in keeping bonsai.
To split the trunk of your bonsai, remove your bonsai from its pot.
Then turn your bonsai upside down and using a saw or cutting tool, cut the bonsai trunk about halfway down the size of your tree.
Then repot your bonsai and wire together in a larger pot.
Nurture this tree over a few years and when the split heals, the tree will appear much larger.
This method can also be used on branches should you want to increase the size of a branch.
Use bonsai the tourniquet method
Another great method for increasing the thickness of the trunk of your bonsai or adding nebari to your tree trunk is to follow the tourniquet method.
The tourniquet method will make you wrap the base of your trunk in a tight copper wire – this can also be done with especially bonsai tourniquets you can get online.
Wrap the wire tightly around the tree.
This will cut off the nutrient flow to the tree in the cambium to the higher part of the tree.
The trunk below the copper wire will have a larger amount of nutrients than it would normally, causing the tree to increase in size below that point.
What is bonsai trunk development?
Bonsai trunk development is the process of developing a bonsai trunk to be more visually appealing, through-thickness, shape, and trunk taper. This helps best mimic the look of a tree trunk from a regular aged tree.
Advantages of bonsai trunk development?
The biggest advantage of bonsai trunk development is it can speed up the time to create aesthetically pleasing, natural-looking tree trunks that bonsai styles require. Trying to grow these naturally will take decades and so bonsai trunk development drastically speeds up the process.
Disadvantages of bonsai trunk development?
The main disadvantage of bonsai trunk development is that it can cause significant damage to the tree if done incorrectly. Many trunk development techniques such as trunk chopping require removing large sections of a trunk which can damage the health of a tree.
On top of this once any work on a bonsai trunk has been completed, it is more susceptible to things like insect infestation or fungal infections in its weakened state.
Why develop the trunk of a bonsai?
The main reason bonsai owners develop the trunks of their trees is to speed up the process it takes to create a thick trunk with natural taper and movement. To create these naturally would take decades, but trunk development techniques speed up this process to a few years.
How long does it take to develop the trunk of a bonsai?
It can take between 4 to 9 years to successfully develop the trunk of a bonsai with most bonsai owners averaging 6 years. Faster growing tree species will produce faster results.
To help explain more the table below should help:
| Method | The fastest time for results | Slowest time for results |
| Growing out a sacrifice branch to thicken a trunk | 3 years | 5 years |
| Bonsai trunk chopping to add taper | 1 year | 3 years |
| Bonsai trunk cutting to add shape | 6 months | 1 year |
What tree species work best for bonsai trunk development?
Fast-growing bonsai tree species such as ficus or Chinese elms work best for bonsai trunk development. These trees can heal quickly from trunk bending and shaping techniques and are also beginner-friendly.
What bonsai tree styles need trunk development?
Cascade, semi-cascade, and informal upright are the main bonsai styles that require trunk development to achieve bends in the trunk. Sumo bonsai will also require trunk development to create a thick short trunk.
Study
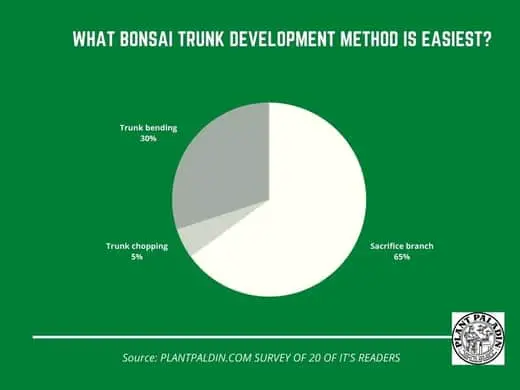
Finally, I didn’t just want to give my opinion on the methods I’ve tried for bonsai trunk development but give some advice from people I have heard it from too.
First I visited my local botanical gardens and asked one of the employees their thoughts on bonsai trunk development – here is what they said:
“ he best method form trunk development for size has to be growing out a sacrifice branch – it’s the safest method and is 100% natural – just keep in mind it will take time to achieve”
I also did a quick survey of 20 plant paladin readers and asked them their thoughts on the bets bonsai trunk development method – here were the results:
My top picks for the gear you will need!
So like I mentioned earlier, over the past three years of running PlantPaladin, hundreds of people have asked me for my recommendations on the best bonsai gear on the market.
Having spent thousands of dollars on bonsai items these past few years and tested at least 100 bonsai-specific products, I’ve listed my favorite products below – All of which I highly recommend and think you can get great value.
They can purchase directly by clicking the link to take them to Amazon.
Bonsai Tool Set: One of the significant challenges I’ve had is finding a toolset that was not only durable but didn’t break the bank. SOLIGT has recently developed a fantastic bonsai tool set that covers all the tools you need to trim, prune, and repot your trees. – You can grab it here.
Complete Bonsai Set: Many of you will want to grow your bonsai trees entirely from scratch, but finding the varicose seeds, pots, and other items in one place can be challenging. Leaves and Sole then have created a complete bonsai set that I’ve personally used that ticks all the boxes. You can grab it here.
Bonsai wire: The number of times I’ve run out of wire for my bonsai or purchased cheap bonsai wire that doesn’t do the job is embarrassing for me to admit. After a lot of trial and error, I found that using Hotop’s aluminum bonsai wire is one of the best options on the market. This can easily be used for both indoor and outdoor bonsai. You can grab it here.
This post was written by Fehed Nicass who has been passionate about bonsai for over 3 years.