
This website is supported by its readers. If you click one of my links I may earn a commission. I am also a participant in the Amazon affiliates program and I will also earn a commission from qualified purchases.
One species of plant that is shooting up in popularity is olive trees. These Mediterranean trees have become a staple for households being kept both indoors and outdoors. As such, the number of people learning how to bonsai an olive tree is also increasing. So what is the exact process to bonsai an olive tree? Keep reading to find out more!
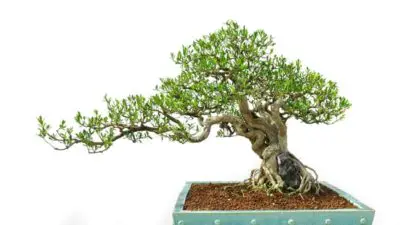
You can successfully grow an olive bonsai tree. To do so, ensure you grow in free draining soil mix if you live in cooler environments and water and prune regularly. Wild olive bonsai species will work best for this due to their short leaves, internodes, and deadwood.
So, what are the advantages and disadvantages of keeping an olive tree bonsai? And should you keep olive tree bonsai indoors or outdoors? Keep reading to find out more!
Just a quick heads up, over the past three years of running Plantpaladin, hundreds of people have asked for product recommendations. As such, You can find my favorite indoor bonsai tree here (link takes you to Bonsaiboy), my favorite outdoor bonsai tree (link takes you to Bonsaiboy), or have a look at all the products I recommend here.
How to bonsai and olive tree
Think of olive trees, and your mind will likely race back to ancient Greece, with thoughts of potters sitting in a garden with this fauna blowing breezily in the background.
Whilst olive trees have been popular for thousands of years, they are making something of a resurgence, with the species growing in popularity over the past decade.
As such, the number of people using olive trees in bonsai is also increasing.
I decided to jump on the bandwagon and figure out how to grow an olive tree bonsai.
As such, I contacted my local botanical gardens, spoke to a few bonsai experts, and even surveyed plant paladin readers.
To successfully bonsai an olive tree, then:
- Ensure it’s the right time of year
- Come up with a design
- Decide how large you want your olive tree to grow
- Decide if you will grow your tree from scratch
- Invest in the right potting soil
- Plant your olive tree bonsai cutting/seedling
- Repot your olive bonsai
- Move your olive tree into the right environment
- Wire your olive bonsai tree
- Prune the tree
- Repeat the process
Olive bonsai tree quick facts
Now, keeping any bonsai tree requires its unique challenges, so to help summarise some of the daily care required, I’ve enclosed a table below that should help:
Olive Bonsai Care | Explained |
Water | Check once per day if the soil is dry to the touch. If so, the olive tree needs watering. Non-bonsai olive trees require watering only once per week, but bonsai trees typically will need more water so once per day should be ideal. Only water once per week during the winter in cold temperatures. |
Sun | 4 to 8 hours of direct sunlight in the summer |
Temp | 0-95 degrees Fahrenheit ( -12 to 35 degrees celsius) |
Local | Both indoors and outdoors in a spot that gets a lot of sunlight |
Food | Fertilize once per month during the summer months. No fertilizing is required in winter. |
Growth | Slow growing – 2 to 4 inches per year. |
Let’s explore this in more detail:
What are olive bonsai?
Before we dive into the exact step-by-step method of growing an olive bonsai tree, it is best to dive into a little more detail about what an olive bonsai is.
Well (it’s all in the name), olive bonsai trees are made of any olive variety.
These are commonly found and located in warm countries because these trees are very heat resistant.
That said, many people in cooler climates, such as the UK, have found ways to cultivate these trees through free-draining soil mixes that do not retain water.
These trees are generally prided due to a trunk that changes with time, starting as smooth and even and eventually developing into a thick, gnarly trunk.
How to bonsai an olive tree – step by step
So, let’s dive into the exact process of how to bonsai an olive tree
Ensure it’s the right time of year
Before transforming an olive tree into an olive bonsai, it’s important to note the time of year.
Turning an olive tree into a bonsai requires a lot of work, such as trunk chopping, wiring, pruning, and repotting, all of which can significantly weaken the tree.
This means that olive trees will need a few weeks of recovery time.
If you are thinking of training your olive tree into a bonsai in the winter, your olive tree won’t have enough time to recover from the intense process.
The best time of year to train an olive tree into an olive tree bonsai will be in the early spring before any buds appear in the tree. This will give the tree plenty of time to recover from any form of training before the tree becomes less efficient in the winter.
Whilst olive trees are coniferous, meaning they don’t shed their leaves in winter – you should still train them in the early spring as they have a harder time recovering during the winter.
If you keep your olive tree bonsai in a greenhouse, the training process can be done any time of the year.
Come up with a design.
While you might be keen to start repotting and wiring your olive tree immediately, I always find that creating a design first will dramatically increase your chances of creating a successful bonsai tree.
Bonsai trees come in various styles, such as sumo, cascade, semi-cascade, and informal upright.
Once it is complete, an idea of what your olive bonsai tree will look like will help you in the wiring and pruning process.
Drawing a rough outline with a pen and paper and sticking to it will help massively.
If you decide to change your tree’s design a few years later, you can always draw up a fresh plan, but doing this in the first instance will help massively.
Which styles best suit olive bonsai?
One of the significant benefits of olive bonsai is its versatility, allowing you to shape it in any bonsai tree style.
As such, I would recommend designing your Olive bonsai in the following:
- Chokkan
- Moyogi
- Kengai
- Hang-kengai
- Sakan
- Fukinagashi
- Ishizuki
- Bunjin
- Sokan
- Seki-joju
- Sharimiki.
Decide how large your olive tree to grow
So you know the style you want your tree to look like. Now, it’s time to determine how large you want your tree to grow.
So why is this important?
Well, olive trees are notoriously slow-growing, meaning they can add as little as two inches of growth in the space of a year.
As such, if you want a large olive bonsai tree, such as an imperial size bonsai, it will take decades to achieve if growing from a cutting or seedling.
If, however, you are happy with a smaller-sized one-hand or two-hand bonsai, then olive trees are perfect.
Size classifications are a topic all to themselves.
If you are considering entering your olive bonsai tree in a competition in the future, it’s important to know the different size classifications – after all, larger bonsai trees in higher size classifications will usually sell for a lot more.
Feel free to check out my post on bonsai size classification here or the image and table below.
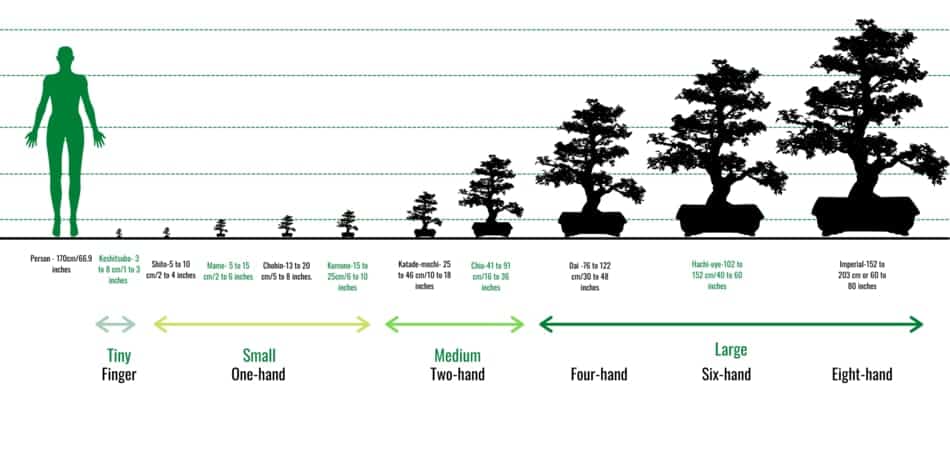
Classification | Size inches | Size Centimeters | Hand Size | General Size |
Keshitsubo | 1 to 3 inches | 3 to 8 centimeters | Fingertip | Tiny |
Shito | 2 to 4 inches | 5 to 10 centimeters | One-hand | Tiny |
Mame | 2 to 6 inches | 5 to 15 centimeters | One-hand | Small |
Chohin | 5 to 8 inches | 13 to 20 centimeters | One-hand | Small |
Kumono | 6 to 10 inches | 15 to 25 centimeters | One-hand | Small |
Katade-mochi | 10 to 18 inches | 25 to 46 centimeters | Two-hand | Medium |
Chiu or Chumono | 16 to 36 inches | 41 to 91 centimeters | Two-hand | Medium |
Dai or Omono | 30 to 48 inches | 76 to 122 centimeters | Four-hand | Large |
Hachi-uye | 40 to 60 inches | 102 to 152 centimeters | Six-hand | Large |
Imperial | 60 to 80 inches | 152 to 203 centimeters | Eight-hand | Large |
Decide if you will grow your tree from scratch
Next up is one of the most important decisions when tuning your olive tree into an olive tree bonsai.
Do you grow your tree from a seedling/cutting, or do you get an existing store-bought olive bonsai and train that?
Growing from seedlings/cuttings
Growing your olive tree bonsai from seedlings or cutting can be one of the most rewarding experiences as a bonsai owner.
This method will give you complete control of your tree, allowing you to design your tree in the exact style you want your tree to grow.
The downside, however, is as olive trees are so slow-growing, they will take a while to reach maturity.
Most bonsai trees can take 3 to 5 years to reach maturity and 15 years to fully grow and perfect.
If you are patient, growing an olive bonsai tree this way might be the best option.
Buying a store-bought olive bonsai
If you are impatient (like me) and want to speed up the process of designing a bonsai tree, I recommend buying a store-bought tree already a few years old.
This will save you a lot of time in the trunk development stage and allow you to move straight into the development of the branches of your tree.
What’s even better is if you are happy with how the store-bought olive bonsai tree looks, then all you will need to do is maintain the size and style of the tree through regular pruning.
The downside is that store-bought trees can be more expensive, so if you don’t have the budget, consider growing them from scratch.
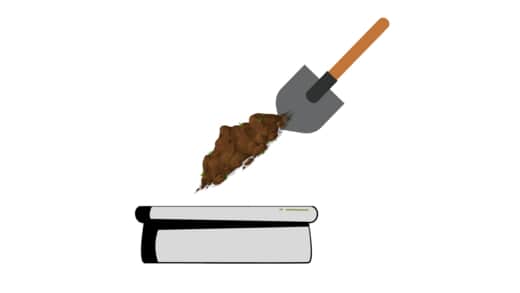
Invest in the right potting soil.
So now you have decided if you will be growing your olive bonsai tree from scratch or if you will buy an existing store-bought olive tree bonsai; next up, we need to get our materials together.
Easily, the most important material will be the correct potting soil.
Regardless of the bonsai tree species, potting soil must allow moisture to flow through easily, provide great aeration, and retain moisture to ensure your tree does not dry out.
For olive trees, aim for your soil to have slightly more moisture flow then other species if living in a cooler environment.
For coniferous species such as Olive tree bonsai, the best potting soil would be an inorganic mix of akadama and volcanic ash.

Best soil mix for olive bonsai
A good ratio would be the following:
50% akadama, 25% volcanic ash lava rock, 25% pumice.
The potting soil must also be neutral between pH levels 6.5 to 7.5.
Having potting soil that is too acidic or alkaline will potentially impact the nutrient flow of your olive tree bonsai.
If you only have organic soil, cactus soil is a good mix, which works surprisingly well as potting soil for all bonsai.
To read more on bonsai tree potting soil, check out my post here.
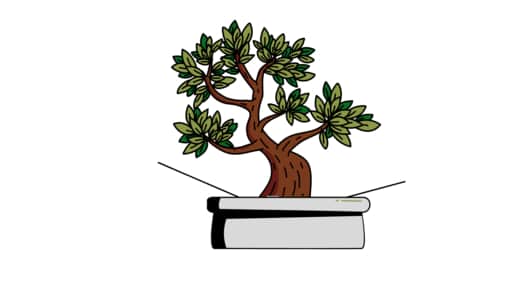
Repot or plant your olive tree bonsai
Now comes the most difficult part of creating a bonsai from an olive tree.
Repotting/planting are similar but have their unique parameters that need to be sought out, so let’s explore these individually below:
How to plant an olive tree bonsai
Planting an olive tree bonsai is the method you will follow if you are growing your olive tree bonsai from scratch – to find the full process, check out my post on planting a bonsai tree here.
To summarise, however:
Select your cutting or seedling
First, decide if you will plant your olive tree bonsai from a cutting or a seed.
Using cuttings
If you use a cutting, make a clean cut at a 45-degree angle and remove any large leaves or excess branches.

If you are planting from a seed/pit of an olive, you must get the correct seeds from a reputable retailer or treat the olive seeds you want to grow first.
To treat the olive seeds/pits, pick the seeds from olives that are on the tree and have not fallen into the topsoil.
Lightly hammer these olives with a hammer so the flesh of the olive breaks.
Then, pick the pointed end of the pits with a bolt cutter or a crashing device – just be careful not to break through the seed.
Soak them in 24 hours, and they should be good to plant.
Gather your pots
Next, it is time to gather the pot where you will plant your seed or cut.
The pot size will depend on the size of your cutting or seed.
If you are growing from a seedling, using a pot with about 15cm or 6 inches of depth will be ideal.
If you are growing from a cutting, then using a larger-sized pot, such as a large yogurt pot, works surprisingly well.

It’s important that whatever size pot you decide to use, it has plenty of drainage holes for the size of your seed or cutting.
Hopefully, the table below will help:
Size Classification | Size inches | Number of penny-sized holes | Number of pencil-sized holes |
Keshitsubo | 1 to 3 inches | 1-2 | 0 |
Shito | 2 to 4 inches | 1-2 | 0 |
Mame | 2 to 6 inches | 2 | 2 |
Chohin | 5 to 8 inches | 2 | 2 |
Kumono | 6 to 10 inches | 2 | 2 |
Katade-mochi | 10 to 18 inches | 2 | 3 |
Chiu or Chumono | 16 to 36 inches | 2 | 4 |
Dai or Omono | 30 to 48 inches | 3 | 6 |
Hachi-uye | 40 to 60 inches | 4 | 8 |
Imperial | 60 to 80 inches | 6 | 8 |
Add your soil mix
We discussed the best potting soil mix earlier, so put your potting soil into your pot of choice at this stage.
Ideally, this should be around 3 inches deep or about 9cm for the bonsai process.
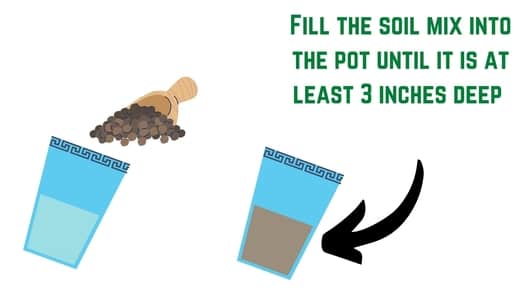
If you are planting from seed, you can plant your seed in the potting soil and move on to the propagation step.
If plating from a cutting, you must follow the next few steps.
Prepare your olive bonsai cutting to be planted.
If you are using a cutting from an olive tree branch to grow an olive tree bonsai, it is super important you follow this step.
Before the olive tree branch grows in the potting soil, we must prepare it.
To prepare your olive tree cutting for bonsai, start by carving a 1mm deep grove on the bottom of the cutting – this will act as a guideline.
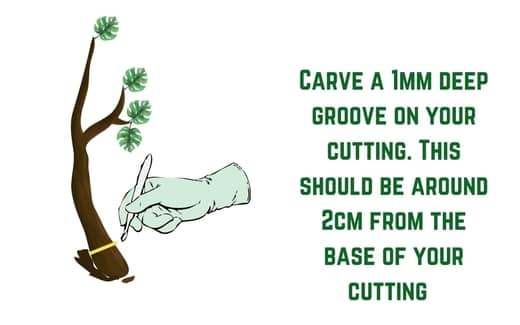
Then, depending on the size of your cutting, remove the bottom few mm/cm from the cutting – in this example, we will use a relatively large cutting, so we will need to remove the bottom two cm.
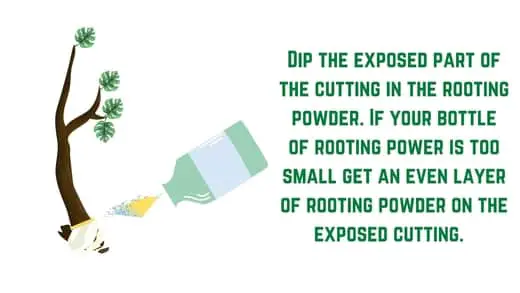
Then peel back this bottom section of your cutting, removing the cambium until the white inner wood of the cutting shows.

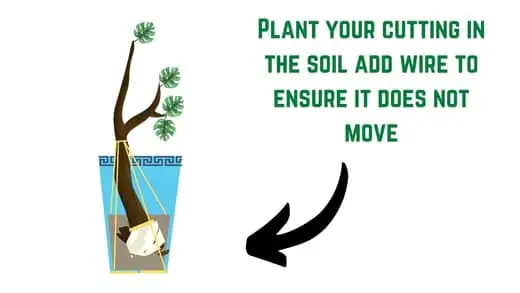
Then, attach a copper wire to the bottom drainage hole and plant the cutting in the pot. Tie this wire around the cutting to ensure it does not move.
Keep in a propagator and maintain the temperature.
So now your seeds/cuttings are planted, the next few weeks will be vital to growing your tree from scratch.
As such, one of the best things you can do at this stage is to keep in an environment where you can control the temperature.
Growing the seeds/cuttings in a propagator or greenhouse where you can control the temperature will be vital.
When trying to sprout olive seeds/roots on the cuttings, the best option will be to keep them at around 60 degrees Fahrenheit (16 degrees c) for the first few weeks, ensuring that you water them daily, keeping the top few cm of topsoil moist but giving it time to dry out in between watering sessions.
Then, after about four weeks, increase the temperature to about 70 degrees and repeat the watering process for another four weeks.
By this point, new roots/growth should have occurred, and it will be time to ease these cuttings/seeds outdoors.
Ease the new bonsai into its new environment.
Once your seedlings/cuttings have started to grow, it is time to ease them into their new environment.
Start then by keeping the seedling in the shade for about one week.
The week after, ensure your seedling/cutting gest about three days of direct sunlight and four days in the shade.
One week after that, allow your seedlings/cuttings to rest in the area where you will keep them, as they will be strong enough to grow by themselves.
Maintain and let the seedlings/cuttings grow.
At this stage, you will have a very immature seedling cutting with which you can start the bonsai process.
As such, I would let your tree seedling/cutting grow over the next two years without repotting.
At this time, you will strengthen your tree by watering regularly (checking the topsoil daily to see if it is dry), checking for pests and fungal infections, maintaining its temperature, and regularly caring for the tree.
After a few years, your tree will be ready for repotting.
Repot your olive tree bonsai.
Now, if you have decided to go for a store-bought olive tree bonsai, Or the seedlings/cuttings you have planted have matured – the next step to growing an olive tree bonsai will be repotting.
Younger olive tree bonsai can be repotted every 3-4 years, with older olive tree bonsai only needing to be repotted every 5 to 8 years. This is because olive tree bonsai is a slow-growing tree species, making them ideal for indoor bonsai.
Similar to plating an olive tree seedling/cutting, repotting a bonsai tree is an exhaustive process all in itself, so I would recommend checking out my post here; however, to summarise:
Select the right pot
You will move your tree from a small shallow pot it is in now to a larger-sized pot with ample room for more root growth.
Aim for a pot around 80% the size of the widest point in the tree’s canopy.
You can also refer to the table earlier in this post to measure the size of your tree and the number of drainage holes your tree should have.
Remove your bonsai from its existing pot
Next up, remove the bonsai tree from its existing pot.
Go around the edges of the pot your bonsai tree is in with a root hook.
This should loosen up some topsoil and make it easy to pull out your tree.
Remove the soil using a root hook.
Next up, we need to access the roots of your bonsai; however, there will likely be a lot of soil surrounding it.
If this is the case, use the root hook to remove some excess soil.
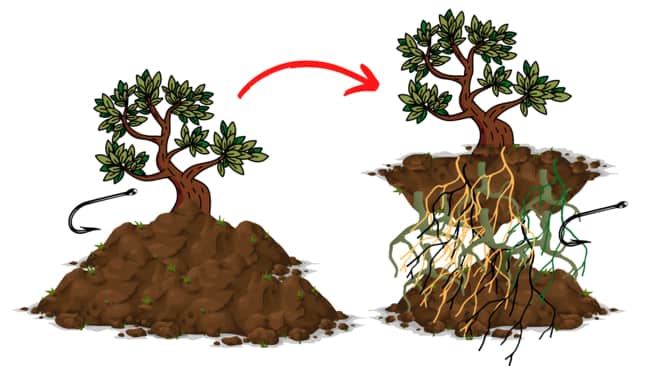
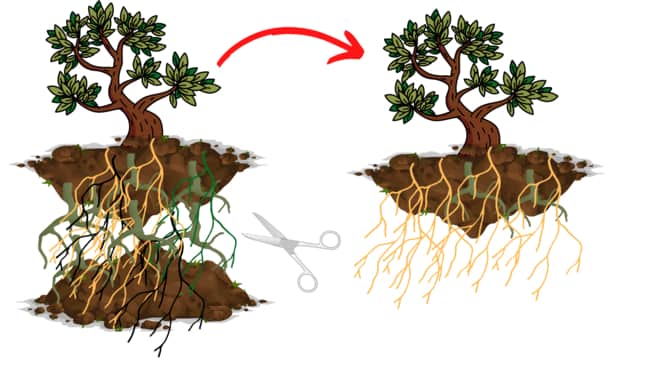
Cut any excess roots
Now remove and cut any excess roots that your tree has.
Reducing some of the larger roots and the smaller feeder roots.
Your bonsai should then be ready for its new pot.
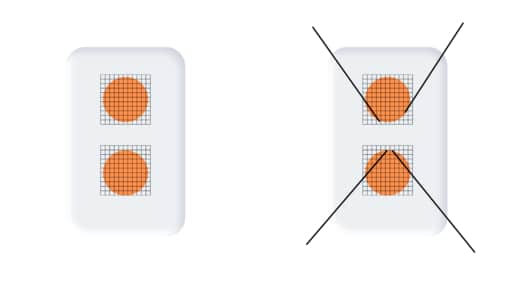
Prepare your drainage holes.
The next step is to prepare the drainage holes in the new bonsai pot.
To do this, cover the holes of your bonsai pot in drainage mesh, preventing soil from falling out.
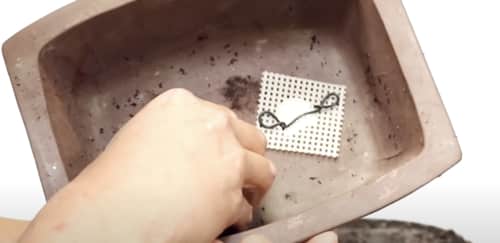
Then, attach a 2mm wire and apply a loop to hold the mesh in place.
Easternleaf has a brilliant video on this. You can check it out here.
Add wire to secure the tree.
Before you place your bonsai in the new pot, it is important to add wire to secure the tree in place.
Use copper or aluminum wire and loop this through your pot’s bottom drainage holes and mesh.
Add a base layer of potting soil.
Now that your pot is prepared add a dusting of the potting soil mix we discussed earlier.
Place your tree in the pot at a front-facing angle
Then, place your bonsai tree in the pot at the most aesthetically pleasing angle.
Using the copper wire, secure this tree in place so it does not move.
Finish by adding potting soil
Finally, finish repotting your olive bonsai tree by adding the remainder of the potting soil.
Ensure that no gaps in the soil or air bubbles can cause your tree to dry out.
Master the aftercare process.
Like planting a cutting/seedling, it is important to master the aftercare process of regular watering, fertilizing, and placement of your new olive bonsai tree.
Again, it’s a different topic, so check out my post here.
Alternatively, I’ll touch on these requirements later in the post.
Move your olive tree into the right environment.
We touched upon this earlier, but once you have successfully repotted your bonsai tree or started the growing process from a cutting/seedling, you must move your olive bonsai tree into position.
One of the biggest benefits of olive bonsai is that they are incredibly versatile and do well indoors and outdoors.
As such, they should be placed indoors, near a window where they can get plenty of direct sunlight (up to 8 hours per day during the summer), or outdoors in the bright spot in your garden.
As olive trees naturally grow in warm Mediterranean climates, this would be the best condition for them.
During the winter, I would also recommend keeping these trees in a cold spot in your house, such as a garage, to prevent them from getting cold-related injuries.
These plants naturally thrive in hardiness zones 8-10, according to the USDA, so keep that in mind depending on where you live.
Develop the trunk of the olive bonsai
Once your tree has been repotted, the training process can begin.
Training a bonsai will transform your regular-looking bonsai into a more visually pleasing style.
If you are happy with how your tree looks, you can leave it as it is.
The first step to training a bonsai is to develop the trunk of your tree.
Most bonsai trees have very different trunk styles.
For example, sumo bonsai trees have short, thick trunks that gradually taper.
Cascade bonsai, however, have thin-sized trunks that change.
To train the trunk of your olive bonsai, the three things you will need to keep in mind are:
- How to thicken up the trunk of the tree
- How to add a taper to the trunk
- Where to add bends to the trunk of the tree.
The best way to achieve these is by doing the following:
- Growing out a sacrifice branch – this will add a lot of thickness over the trunk of your tree – grow out a branch of your tree for 3 to 5 years untouched
- Bonsai trunk chopping will add a significant amount of taper to the tree by chopping off the top part of your trunk.
- Removing part of the trunk – this will make it easier to add bends into the tree.
Now (like many things in this post), bonsai trunk development is a topic all onto itself, so read up more about how to train your olive tree bonsai trunk – check out this post here.
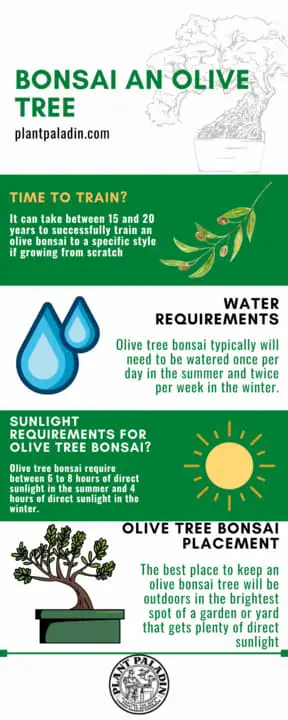
Just keep in mind, however, that as olive trees are slow-growing, it can take between 5-8 years to achieve the desired trunk look you want to achieve.
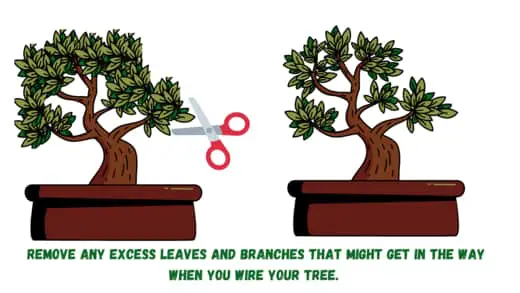
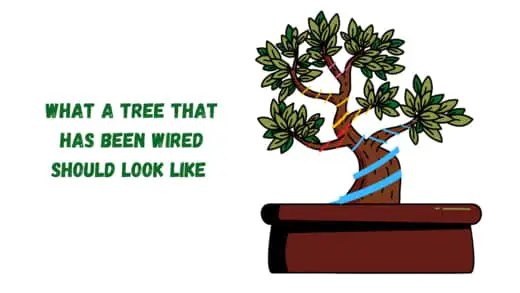
Wire your olive bonsai tree.
Once you have developed the trunk of your olive tree over a few years – the next step in training an olive tree bonsai will be to wire the branches of your tree.
Wiring the branches of your olive tree will allow you to create movement in the branches, making your tree look more visually appealing, truly mimicking a miniature tree.
To wire an olive bonsai tree, then:
Remove any excess foliage
Olive tree bonsai leaves are usually quite small, but they can overgrow.
Removing some of these leaves will make the wiring process easier.
Use a sharp pair of shears and remove any excess leaves.
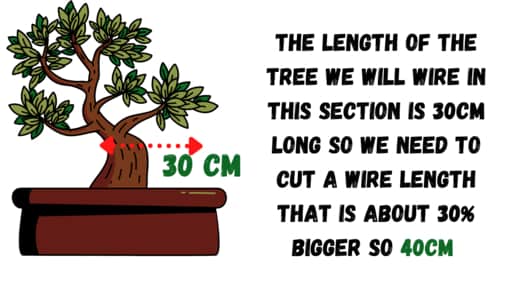
Select the right wiring
Copper wiring is the best choice for olive tree bonsai.
Olive trees can have relatively thick branches, so the copper wire will perform better than aluminum, which can be brittle.
Ensure the copper wire is about 1/3rd the size of the branches you want to wire.
Cut your wire to size; aim for this to be about 30% bigger than the size of the branch you will be wiring.
Wire your olive bonsai
Next up, wire your bonsai.
This can either be done through single wiring or double wiring.
Single wiring
Single wiring is undertaken when you wire a single branch with one piece of wire.
To do this, wrap the wire around the trunk of your olive tree and then wire the branch at a 45-degree angle.
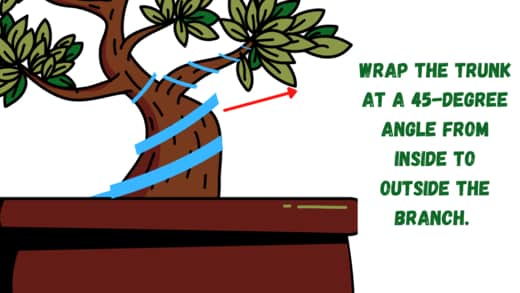
Then, repeat this process on the secondary and tertiary branches.

Repeat this process for the other branches that need to be single-wired.
Single wiring can work better on smaller, thinner, and weaker branches.
Double wiring
To double wire, wire two branches next to each other with the same wire.
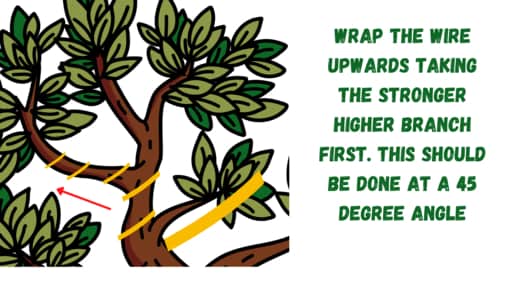
Wrap the wire around the tree trunk and then wrap it on the stronger branches before moving to the lower branch.
This method works well when you need to add significant movement to the tree or have strong branches.
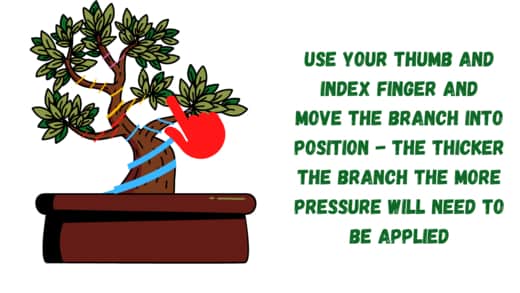
Move olive branches into position
Once your tree has been wired, move the branches into position.
The best way to do this is to use your thumb and index finger on the points where the wire caused the olive tree.
If the branch returns to its original position, you will require a thicker wire.

Remove the wire
Do not unwrap this by hand, as it can cause further damage to the tree.
Wiring an olive tree will take 6 to 8 weeks, which will be longer than other plant species due to the speed at which the tree grows.
Prune the tree
The next step in creating an olive bonsai is to regularly prune the tree.
Pruning an olive bonsai tree will prevent growth from getting too big on your tree, and it is vital to keep a clean-looking tree that falls into the exact size classification you like.
This process is simple enough: ensure that if any leaves or branches go out of the general silhouette of the tree style you are going for, these are pruned.
To prune, use a sharp pair of bonsai shears or scissors and cut the branch at the base of the leaves at the petiole of the tree.
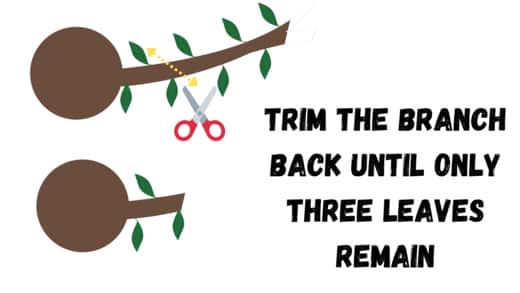
If you are unhappy with how dense the canopy of leaves is for your olive tree bonsai, consider defoliating 80% of your olive tree bonsai leaves.
This will cause more leaves to grow from the buds of the leaves you have just pruned, creating a denser, thicker leaf canopy.
When removing the leaves, it is important not to make one giant cut across multiple leaves but to cut each leaf individually; doing this can cause irregular growth and damage the leaves.
Don’t over-prune, however, as branches and leaves will be vital for overall bonsai health, such as through photosynthesis.
Repeat the process
So, the steps we talked about above will cover the first ten or so years of growing an olive tree bonsai and how to train an olive tree bonsai.
However, growing a bonsai tree is not an easy process, so you will likely have to repot your tree, wire your bonsai, and prune your tree regularly to achieve the desired look and style for your olive tree.
To summarise:
- Repotting should be done ideally every 3 to 4 years when young or 5-8 years if you have an older tree.
- Wiring should be done once per year once the olive tree has matured. Wiring can be started in the late winter/early spring to make the most of the tree’s growth season.
- Pruning should be done whenever the tree grows beyond the silhouette of the tree style you have in mind – think of it as trimming a hedge.
- Defoliation should be done roughly once per year – only during the early spring.
Creating an olive bonsai tree can take decades, but following these steps will work wonders!
Advantages of an olive tree bonsai
Olive tree bonsai has several advantages, including:
- Water requirements – Whilst these trees still need to be watered, they often do not need to be watered as much as other bonsai species. Watering once per day should work.
- Clean the air – Should you keep your olive bonsai indoors, it can help with purifying the air.
- New roots – The Olive tree’s bonsai can easily create new roots, making it much easier to create deadwood such as nebari.
- Longevity – Olive tree bonsai comes from olive trees that can live for thousands of years if cared for properly.
- Fruit-bearing – olive tree bonsai can also bear olive fruit
- They can be grown indoors, ideal for tight spaces such as apartments.
Disadvantages of olive tree bonsai
Like all tree species, olive trees also have many significant disadvantages.
These include
- Slow growing – Olive tree bonsai typically only grow a few inches every year, meaning they can take a while to shape
- Tough wood – Olive tree bonsai has tough wood, meaning stronger copper wire has to be used when wiring – this is more likely to lead to breakages in the mark.
- Harsh winters – Olive tree bonsai need to be kept indoors during cold winters, or else they will die
- Sunlight requirements – these trees require a lot of sunlight. If you keep these indoors for years, their health will suffer.
What are the best species for olive bonsai?
One of the best things about olive tree bonsai is that about 20 or so olive tree varieties can be used to transform into bonsai trees.
All of these will have characteristics of small, dense leaves and thick trunks, making them a natural fit for growing.
The two major olive species used for growth in olive bonsai are the wild olive (Olea sylvestris) and the European olive (Olea europaea).
Now, while you can successfully grow both of these, I’ve created a table below comparing the two so you can decide for yourself which works best for you:
Characteristic | Olea sylvestris Bonsai | Olea europaea Bonsai |
Species | Olea sylvestris | Olea europaea |
Common Name | Wild Olive | Common Olive |
Origin | Mediterranean region | Mediterranean region |
Size | Typically smaller | Larger leaves, larger |
Leaf Size | Smaller leaves with elongated shape | leaves, oblong or oval shape |
Trunk Characteristics | Usually gnarled, twisted, and rugged | Often thicker and smoother trunk |
Flower Characteristics | Tiny white to cream flowers in clusters | Small white flowers |
Fruit Characteristics | Small olives with a bitter taste | Larger olives with a milder taste |
Maintenance | More demanding in terms of pruning and styling due to smaller leaves and compact growth habit | Somewhat easier to maintain due to larger leaves and growth habit |
Soil Requirements | Well-draining, sandy loam soil with good aeration | Well-draining, sandy loam soil with good aeration |
Sunlight Requirements | Full sun to partial shade | Full sun to partial shade |
Cold Hardiness | Hardy to Zone 8 and above | Hardy to Zone 8 and above |
Watering Needs | Moderate watering, allowing soil to partially dry between watering | Moderate watering, allowing soil to partially dry between watering |
Are olive bonsai trees evergreen?
Olive bonsai trees are evergreen, meaning you won’t have to worry about their leaves falling off in the fall or winter. These trees are usually suited to warmer climates; however, you can expect them to keep their leaves even in cooler temperatures.
How to grow an olive bonsai tree – Videos
Now, I appreciate that some of you are very visual learners, so I found the following videos, which should help create your olive bonsai.
Olive bonsai care requirements
I’m sure many of you still have questions about the exact care requirements for olive tree bonsai.
Hopefully, the next few points should help clear up any additional queries:
Temperature requirements for olive tree bonsai?
The best temperature to keep an olive tree bonsai in is 0-95 degrees Fahrenheit (-12 to 35 degrees Celsius). Should the temperature drop below this, the bonsai will freeze. Should temperatures exceed this, olive bonsai will burn.
Growing olive bonsai in the cold?
So, one of the critical things we have not discussed is how to grow an olive bonsai tree in colder temperatures.
After all, most of you will be based in myc cooler climates than the Mediterranean, where these trees thrive.
While general sunlight and pruning goals will remain the same, soil is a big challenge for these trees.
You see, while any solid can be used in hot climates in wetter temperatures, it is easy for these trees to become waterlogged and for overwatering to occur.
As such, ensure that any potting soil you choose has stronger free-draining soil mixes.
This will allow water to flow through easily around your soil and prevent the topsoil or roots of your bonsai tree from freezing in winter.
Regular soil can be used in the spring and summer months.
How fast does olive tree bonsai grow?
Olive tree bonsai is a slow-growing tree, only growing on average between 2-5 inches per year. This means it can take 15 years for the tree to reach full maturity if growing an olive tree bonsai from scratch.
Water requirements for olive tree bonsai?
Olive tree bonsai typically must be watered once daily in the summer and twice weekly in the winter. Touch the topsoil; water the tree thoroughly from top to bottom if dry.
Olive trees not in bonsai form only need to be watered once weekly. However, turning the olive tree into a bonsai will require more water.
Sunlight requirements for olive tree bonsai?
Olive tree bonsai require between 6 to 8 hours of direct sunlight in the summer and 4 hours in the winter. Ensure these trees are kept in a bright spot with plenty of sunshine.
Where to place an olive bonsai?
The best place to keep an olive bonsai tree will be outdoors in the brightest garden or yard with plenty of direct sunlight. Olive tree bonsai can also be kept indoors, provided they are in an area with sunlight, such as a kitchen window sill.
How long does it take to train an olive tree bonsai?
It can take between 15 and 20 years to successfully train an olive bonsai to a specific style if growing from scratch. This is because trunk development and growth can take a few years, and olive trees are a slow-growing species.
Wiring and deflation can be archived relatively quickly.
Fertilizer requirements for olive tree bonsai
Olive tree bonsai requires solid organic fertilizer once per month in the spring and summer months. Fertilizing an olive tree bonsai should be avoided in the fall and winter. Liquid fertilizer can be used once per week.
How often should you repot an olive tree bonsai?
Olive tree bonsai should be repotted once every 3-4 years if they are younger and smaller. Older olive trees that are more than 20 years in age can be repotted every 5-7 years.
Should you pinch olive bonsai?
The leaves of an olive bonsai tree can be pinched between April and October. These leaves should only be pinched when the leaves are relatively long, between 7 and 9. You can then pinch these back to 2 to 3 pairs of leaves per branch.
Olive tree bonsai care in the summer
During the summer, the following should be undertaken to care for the olive bonsai as best as possible:
- Check multiple times daily for water requirements – if the topsoil is dry, your tree will need watering. Aim to check the topsoil during the summer at least twice daily.
- Keep in the shade – whilst the olive tree bonsai will need up to 6 to 8 hours of direct sunlight, keeping your tree in the shade in your garden can be the best option to give a low UV light year-round. This will also help prevent your tree from burning should it get too hot.
- Check for insect infestations – pests such as aphids and spider mites love olive tree bonsai due to their fruit, so be sure to keep an eye out for these during the summer.
Olive bonsai care in the winter
To care for an olive tree in the fall or winter, do the following:
- Remove any olives from the tree – during the fall to mid-winter; olives will start to grow on the tree; ensure you remove these to prevent pests such as foxes, squirrels, mice, rats, and birds from attacking your tree.
- Move your tree indoors – a cold garage works perfectly if you live in a place with a harsh, snowy winter.
- Water once per week – during the winter, olive trees do not need to be watered as much – too much watering can cause the tree to freeze and can create frost on the tree.
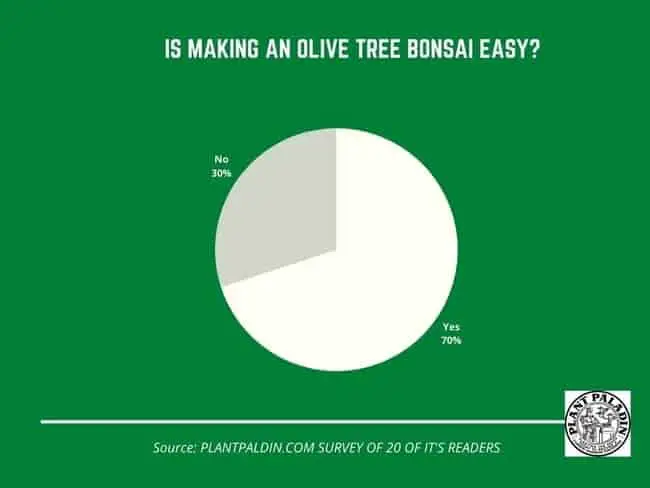
Study on olive tree bonsai
Finally, I did a quick survey of plant paladin readers who owned olive tree bonsai and asked them if it is difficult to grow and train an olive tree bonsai.
Here are the results:
My top picks for the gear you will need!
So like I mentioned earlier, over the past three years of running PlantPaladin, hundreds of people have asked me for my recommendations on the best bonsai gear on the market.
Having spent thousands of dollars on bonsai items these past few years and tested at least 100 bonsai-specific products, I’ve listed my favorite products below – All of which I highly recommend and think you can get great value.
They can purchase directly by clicking the link to take them to Amazon.
Bonsai Tool Set: One of the significant challenges I’ve had is finding a toolset that was not only durable but didn’t break the bank. SOLIGT has recently developed a fantastic bonsai tool set that covers all the tools you need to trim, prune, and repot your trees. – You can grab it here.
Complete Bonsai Set: Many of you will want to grow your bonsai trees entirely from scratch, but finding the varicose seeds, pots, and other items in one place can be challenging. Leaves and Sole then have created a complete bonsai set that I’ve personally used that ticks all the boxes. You can grab it here.
Bonsai wire: The number of times I’ve run out of wire for my bonsai or purchased cheap bonsai wire that doesn’t do the job is embarrassing for me to admit. After a lot of trial and error, I found that using Hotop’s aluminum bonsai wire is one of the best options on the market. This can easily be used for both indoor and outdoor bonsai. You can grab it here.
This post was written by Fehed Nicass who has been passionate about bonsai for over 3 years