
This website is supported by its readers. If you click one of my links I may earn a commission. I am also a participant in the Amazon affiliates program and I will also earn a commission from qualified purchases.
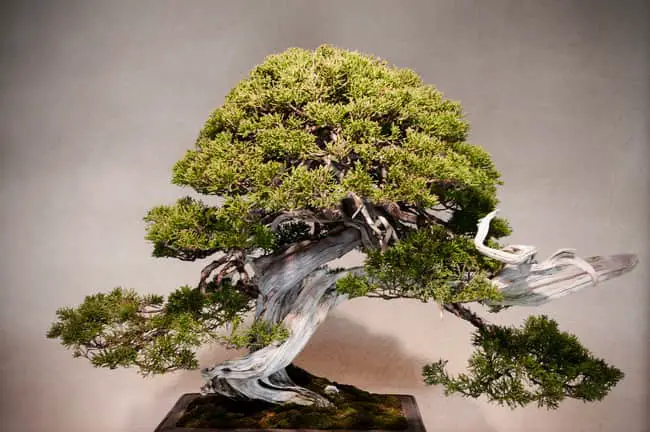
One species of bonsai I’ve always been fascinated with, that I recently added to my collection, was Juniper bonsai trees. So how do you train a juniper bonsai?
To train a bonsai jumper, keep the juniper outdoors. Then decide on the style of tree and develop the trunk of the tree. Use copper wire to hold and grow the tree into position. Finish by maintaining regular pruning when the needles/tips move out of place.
So what are the water requirement of juniper bonsai? And can you grow a juniper bonsai from scratch? Keep reading to find out more!
Just a quick heads up, over the past three years of running Plantpaladin, hundreds of people have asked for product recommendations. As such, You can find my favorite indoor bonsai tree here (link takes you to Bonsaiboy), my favorite outdoor bonsai tree (link takes you to Bonsaiboy), or have a look at all the products I recommend here.
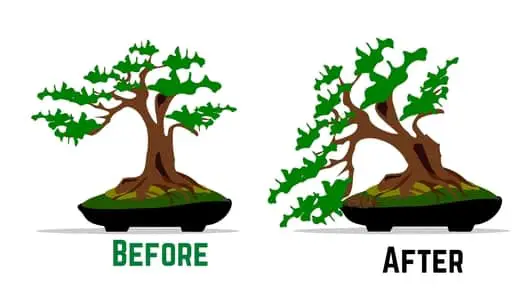
How to train a juniper bonsai
So whilst I’ve had success in growing deciduous bonsai such as Chinese elm over the past few years, one species that I’ve fallen in love with has been Juniper bonsai.
While other pines do add to a beautiful collection, in my opinion, there is no better tree to help boost the quality of any bonsai nursery than a juniper bonsai tree.
As such, I got in touch with a few bonsai experts, visited my local botanical gardens, and even asked a few plant paladin readers on the best way to train a juniper bonsai.
To summarize:
- Ensure it’s the right time of year
- Take note of where the tree is placed
- Decide on the size of the tree
- Decide on the style of the tree
- Invest in the right potting soil
- Create the trunk structure of your bonsai
- Wire your juniper bonsai
- Prune your jumper in place
Let’s explore these in more detail:
|
Juniper Training Method |
Explained |
| Water requirements | Twice per day in the summer. Once to twice per week in the winter. Touch to ensure topsoil is dry before watering. |
| Sunlight requirements | 4 hours per day of direct sunlight as a minimum |
| Location | Outdoor only unless severely cold temperatures in the winter |
| Optimal temeperature range | 10 to 85 degrees Fahrenheit |
| Fertilizer | Once per month in the spring/summer only |
| Growth rate | 5-10 inches per year |

Ensure it’s the right time of year
Before you get started pruning, wiring, hacking, and training your juniper bonsai, you need to take note of the time of year.
As with most trees, trying to train a juniper bonsai in the middle of winter isn’t going to work out very well – with trees historically not having the ability to heal well in the winter months.
Even for evergreen species.
The best time to train, prune and grow a juniper bonsai is early spring. This ensures any damage caused by the training process will be recovered before the harsh winter arrives.
One of the major benefits of conferences species such as Scots Pine or Juniper bonsai is that they hold a lot of sap.
This means that sometimes training them later in the spring to the summer works well. When there is less sap and things will be less messy.
Take note of where the tree is placed
As junipers are coniferous species – meaning they stay green during the winter period and have needle-like-looking leaves – these bonsai species love being kept outside.
Juniper bonsai trees should always be kept outdoors during both the summer and winter. Jumpers should be placed in a bright spot in your garden where they can receive at least 4 hours of direct sunlight per day. Junipers can then be kept in a shaded area.
Juniper bonsai has a habit of turning their needled purple during, particularly cold winters as a way of protecting the tree.
Should this happen to you – don’t worry! This is completely normal and the beautiful green color should return.
It’s also worth noting that in harsh winters – ie temperatures that drop below 10 degrees Fahrenheit – you might want to protect your tree.
This can be as simple as covering it with a waterproof sheet or moving your juniper to a cold spot such as a garage indoors.
To manage the best place to keep a bonsai I’d recommend keeping this in a greenhouse or reading my post on juniper bonsai temperature ranges.
“Juniper bonsai do not need to be kept indoors unless in particularly harsh winters”
Decide on the size of the juniper bonsai
So next up is to come up with how big you and your juniper bonsai will be.
This will help you train the juniper bonsai and grow it to that size.
Typically smaller bonsai such as one-hand bonsai will be a lot easier to train than larger imperial-sized bonsai.
On top of this, the amount of time it takes to grow a bonsai to a larger size can be years if not decades.
That being said, if you do decide to grow a bonsai tree to an older bonsai tree, these usually are valued.
So there is give and take both ways.
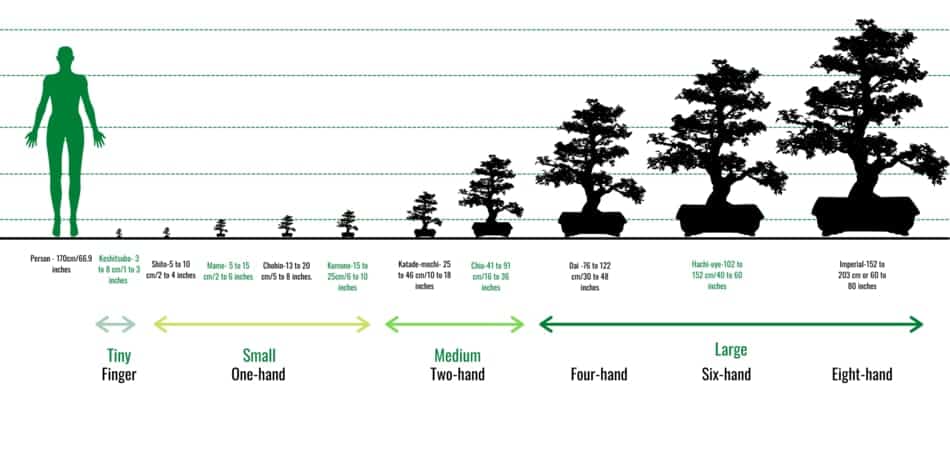
To give you an idea of the different size classifications for bonsai trees check out my post or check out the image below:
| Classification | Size inches | Size Centimeters | Hand size | General size |
| Keshitsubo | 1 to 3 inches | 3 to 8 centimeters | Fingertip | Tiny |
| Shito | 2 to 4 inches | 5 to 10 centimeters | One-hand | Tiny |
| Mame | 2 to 6 inches | 5 to 15 centimeters | One-hand | Small |
| Chohin | 5 to 8 inches | 13 to 20 centimeters | One-hand | Small |
| Kumono | 6 to 10 inches | 15 to 25 centimeters | One-hand | Small |
| Katade-mochi | 10 to 18 inches | 25 to 46 centimeters | Two-hand | Medium |
| Chiu or Chumono | 16 to 36 inches | 41 to 91 centimeters | Two-hand | Medium |
| Dai or Omono | 30 to 48 inches | 76 to 122 centimeters | Four-hand | Large |
| Hachi-uye | 40 to 60 inches | 102 to 152 centimeters | Six-hand | Large |
| Imperial | 60 to 80 inches | 152 to 203 centimeters | Eight-hand | Large |
Either way, it’s always worth knowing the size you want your juniper to get to before you start any form of training.
Decide on the style of the tree
One of the best things about bonsai as a hobby is the different styles you can design your trees in.
No two bonsai trees look the same.
That being said, there are traditionally several styles and looks that bonsai trees can be styled in.
Windswept, cascade, and semi-cascade as well as informal upright bonsai particularly suit juniper trees.
It’s important then to draw out or at least have in your head a rough idea of what bonsai tree style you want your tree to have.
This is important as often designing and creating a bonsai to mimic this style often takes time.
For example, an informal upright juniper bonsai will need a few slight bends in the trunk of your tree meaning this will have to be planned and trained ahead of time.
You can always change the design of your tree mid-way through the process, just ensure that you go into the juniper training process with at least somewhat of an idea of the style of bonsai you want to achieve.
Invest in the right potting soil
A lot of you are reading this post because, like me, you will have just recently purchased a juniper bonsai.
One of the most important things to do when you first get your tree, before any wiring or pruning starts is to just double check you have the correct potting soil mix.
Bonsai soil typically needs the perfect mix of aeration, moisture retention, and moisture flow.
For juniper bonsai, the levels of volcanic ash rock and clay such as akadama are usually higher than for deciduous bonsai species.
The best potting soil for juniper bonsai then would be a volcanic rock mix. A blend of 60% akadama, 30% volcanic ash rock, and 10% organic (such as peat) works best. Ensure that this potting soil is changed once every one to two years.
Cactus soil can also be used as an effective potting soil for outdoor bonsai such as junipers.
To read up more on bonsai potting soil mixes check out my post here.
Now potting and repotting a juniper is a complex process so we will cover this later in the post.
Create the trunk structure for your juniper bonsai
Now it’s time to start the training process for your juniper bonsai!
If you are happy with the way your trunk looks – and your bonsai trunk matches the bonsai style you are going for, you can move on to the next step.
A lot of us will require a little work to be done for our juniper bonsai before we get our trunks looking the way we want.
It’s one of the reasons why buying a store-bought tree as opposed to training juniper bonsai is so popular.
First up then I would recommend training the trunk of our juniper bonsai.
Good trunk training requires 3 main elements:
- A thick trunk
- A gradual taper
- Some movement or bends in the trunk
Luckily these can all be achieved over time with the following methods.
- Growing out a sacrifice branch
- Use trunk chopping to create a gradual taper
- Remove parts of the trunk to add bends to the tree
Now each of these is quite complex, so to read up more on them I would recommend having a look at my post on bonsai trunk development.
Let’s explore these briefly in more detail:
Growing out a sacrifice branch
If your juniper bonsai trunk is just too thin for the design you want to achieve then the first thing you will need to do is add thickness and girth to the trunk.
The best way to achieve this is to simply grow out a sacrifice branch.
A sacrifice branch is simply a branch you grow out of, which you do not cut back or prune for between 3 and 5 years.
This will help the nutrient flow of the tree, and in time, thicken up the size of the trunk of your tree.
After 3 to 5 years (or when you are happy with the girth of the trunk) you can then use a sharp pair of bonsai shears and cut away the sacrifice branch.
Another fantastic method to also help grow a thicker bonsai trunk is to simply plant your bonsai in the ground – allowing your tree to absorb all the nutrients, giving a stronger denser tree trunk.
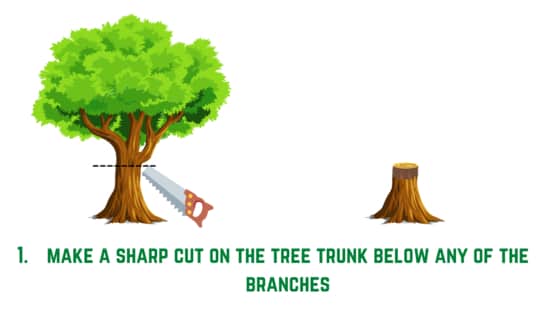
Use trunk chopping to create a gradual taper
If your juniper bonsai needs to be trained to have a gradual taper in the trunk – meaning the bottom of the trunk is larger and wider than the top of the trunk then this too needs to be manufactured.
Now the best way to do this – whilst it might sound a little scary – is to chop the trunk of your bonsai.
To do that then, you would simply chop the trunk of your bonsai, either above or below the branches of your tree.
After a few weeks, new branches will start to grow from the stump of your bonsai.
Over time, one of these new branches will stand out and turn into the new primary leader branch.
This primary leader branch will then be merged into the trunk of your tree as it grows, creating a beautiful taper in the trunk of your tree.
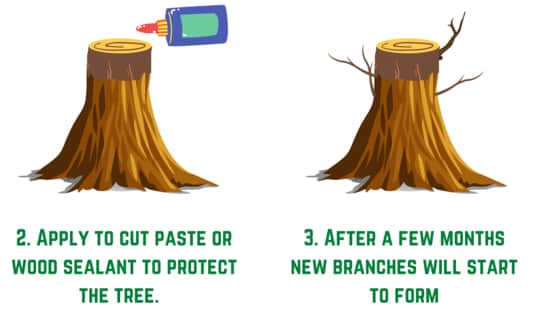
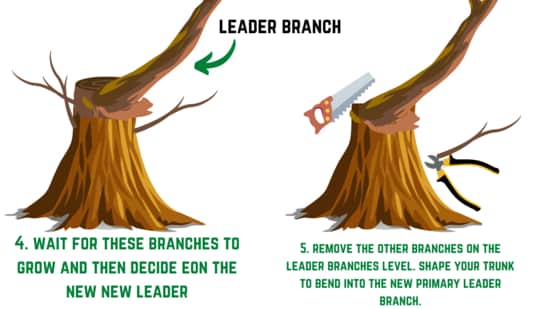
In total, this process will take a few years – between 1 to 3 years so just remember to be patient.
Remove parts of the trunk to add bends to the tree
Now whilst the trunk chopping method above can help add some bends to your juniper bonsai, if you want to train your juniper to have severe bends in the tree – such as in the informal upright bonsai style – then this next step will work wonders.
To add bends to your juniper bonsai, start by weakening the trunk of your bonsai with a trunk splitter.
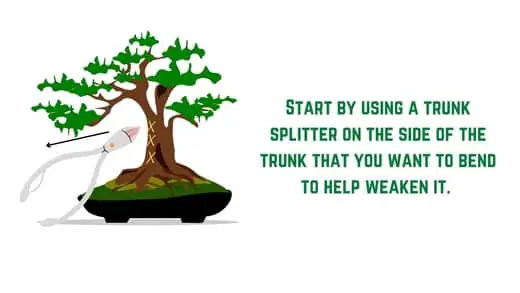
Then using a saw, remove 2-3 chunks about 75% of the way through the trunk.

Apply a guy wire to hold the new wounds you created together.
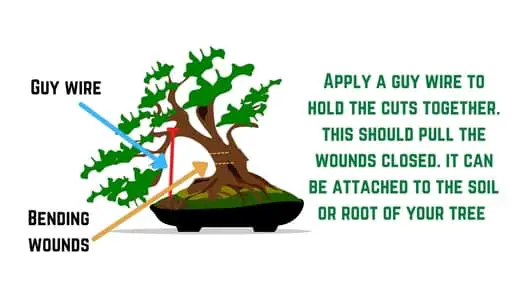
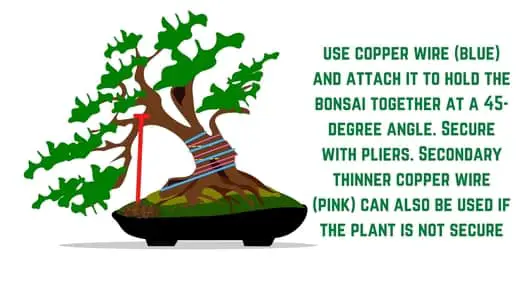
Then at a 45-degree angle, apply copper wire to the tree to hold the juniper in place
After 4 months or so the wounds you will have made will have healed from the process and as your juniper bonsai would have grown, it would have healed with a new bend in the trunk.
You can then repeat this process several times to archives multiple bends in the tree.
Wire your juniper bonsai
The next step in training your juniper bonsai once you have a trunk shape you are happy with is to wire your juniper bonsai.
Wiring a bonsai tree allows you to reposition and bend the branches of a bonsai. As the tree grows it gets set into these new positions, creating a more visually appealing tree. Typically this process takes a few months to complete.
In order to create a more visually appealing juniper tree that mimics the style and look you want, the wiring will almost always be undertaken.
To wire a juniper bonsai:
Choose the right wire
As junipers are kept outdoors, ideally copper wire should be used.
Copper wire is tougher and easier to move when compared to an aluminum wire which can be broken easily.
The wire should also be about 1/3rd the size of the branches.
Select the branches you want to wire together
Ideally, double wiring works best – this is the process of wrapping two branches with the same wire together.
These branches will be of the same thickness – this is important as the thickness of the wire will need to be the same for both branches
Cut your wire to size
Cut your copper wire so that it is long enough to wrap around the trunk of your bonsai once, but also long enough to wrap around the two branches as well.
Wrap the wire around the trunk
As we are only looking to train the branches of the tree – not the trunk ( which we covered earlier in the post) you only need to wrap the copper wire around the trunk of the bonsai as a support mechanism
As such, wrap the copper wire at a 45-degree angle on the section of the trunk where the branches are.
Wrap the wire around the branches
Next, wrap the copper wire at a 45-degree angle from the base of the branch to the tip of the branch – using the same copper wire that you used for the trunk
Wrapping the wire at a 45-degree angle will allow your tree to continue growing.
When using copper wire ensure you only wrap from underneath if you want to move your branches downwards and wrap your branches upwards if you would like to wrap your tree upwards.
Repeat this process for all the branches you can double branch.
Wrap wire around any secondary branches
Next, simply use smaller-sized copper wire – about 1/3rd the size of your secondary and tertiary branches and wrap these around the secondary and tertiary branches.
This will allow you to move the smaller branches into the position you would like.
Just ensure however that the wires you use do not cover each other – this can cut off the nurturant flow in the tips of your braces leading to dead branches.
Move your branches into position
Once your juniper has been wrapped in copper wire, you need to move the branches into the position you would like them to grow in.
To do this, use your thumb and index finger and push the branches on the inside of the branches
Ensure you apply force to prevent any damage to the tree or to stop your trunk from splitting.
Repeat the process for all the branches you would like to wire.
Apply a guy wire if needed
Should your juniper bonsai have thick trunks, then guy wires may need to be used to hold the branches into position.
Simply apply a thick copper wire and attach it to either the base of your pot or an anchor point against the branch you want to move.
This will force the branch to hold into position.
Remove the copper wire
After 3 to 4 months during the growing season, the branches will have grown into their new positions.
It’s important then to remove the copper wire before it starts to dig into the branches and cause damage or leave marks on your tree.
Ensure then that you use a sharp pair of clippers and cut the copper wiring away from the tree.
Prune your juniper
Once your juniper has been successfully wired you can start the pruning process.
Removing the needles ( better known as defoliating the tree) will allow you to grow a healthier dense canopy of needles and promote new growth in the tree.
Pruning is also important when training juniper to ensure you maintain the dark green color of the needles – the older needles become, the more discolored the needles become.
Pruning branched and needles/tips will also help maintain the silhouette of the style of tree you are going for.
How to prune a juniper bonsai?
When pruning the needles/tips of a juniper bonsai, it is important to carefully go through the foliage of the tree and only trim back the needles/tips that have grown too long.
Then using a sharp pair of shears trim these back slightly to the same level as the rest of the needles/tips.
Doing that will ensure that you do not ruin the health of the tree by removing too much foilage.
This process can be time-consuming as you have to go through the needles/tips one at a time but they should be easy to identify.
Avoid hedge pruning when training juniper bonsai
Hedge pruning is the process of removing multiple tips/needles in one go with one cut of your shears. This should be avoided when pruning juniper bonsai, instead only opt to cut one top or needles at a time and only if it is discolored or longer than the rest of the tips.
Prune the branches
Once your juniper bonsai has had its needles/tips pruned, the next step is to trim back any unwanted branches.
This should only be undertaken if the branches are extending beyond the silhouette for your juniper.
To do this, use a sharp pair of shears and make one sharp clean cut of the branch at a 45-degree angle.
The tips of the branch can then be turned into jin if you would like to prevent any further growth from the branch.
With juniper in particular any pruning methods you follow must be undertaken for 1/3rd of the tree.
Junipers are particularly sensitive trees and so removing more than 1/3rd of the needles/tips or branches from your tree may cause significant damage to the tree.
FAQs on juniper bonsai training
So now you understand the basics of training a juniper bonsai, I thought I would answer some of the most frequent questions you are likely to have when it comes to how to train a juniper bonsai tree.
How to repot a juniper bonsai
To repot a juniper bonsai:
- Select a pot that is wider and has more drainage holes than your existing pot
- Use a root hook and remove the juniper from its existing pot
- Reduce the soil surrounding the root ball of the juniper by 70%-80%
- Remove any excess and feeder roots
- Add wire mesh to your new pot to help with drainage and loop wires in the drainage holes to hold your tree in place
- Add a base layer of potting soil to the pot
- Place your juniper bonsai in the pot at a front-facing angle
- Secure the tree into position using copper wire
- Avoid moving the tree over the next few months.
Repotting a tree is difficult at the best of times so to find out more about this check out my post on repotting bonsai here.
How to grow a juniper bonsai from scratch?
Juniper bonsai, like all other bonsai trees, can also be grown from either cuttings or seedlings from other juniper trees.
This process too can be fairly complex which is why I wrote a separate post on it here but to summarize:
- Make a cutting at a 45-degree angle
- Remove any excess leaves
- Use large pots to grow the cuttings
- Add your bonsai soil mix
- Prepare the base of your large cuttings
- Dip the cutting in root powder
- Plant the cutting in the soil.
- Apply root hormone
- Keep in a propagator for four to six weeks
- Ease your Juniper into the sunlight
Juniper bonsai water requirements
Juniper bonsai need to be watered twice per day in the summer, in the morning and evening. Avoid watering during midday in the summer as this can cause juniper to burn. Juniper can be water once or twice per week in winter. Always touch the topsoil to see if it is dry before watering.
Juniper bonsai can also miss watering as they like a higher level of humidity – this can be achieved by misting the needles/tips a few times per week or by placing them in a humidity tray.
Avoid watering your tree in the winter in subzero temperatures.
Junipers are prone to overwatering so be sure to check out my post on how to prevent an overwatered tree.
Sunlight requirements for junipers
Juniper bonsai require at least 4 hours of direct sunlight per day in the summer months, A good range of sunlight for junipers in the summer is between 4 to 8 hours. Ensure juniper bonsai is kept in the shade if sunlight exceeds this.
Juniper bonsai temperature requirements
The best temperature range to keep juniper bonsai in is 10 to 85 degrees Fahrenheit (-12 degrees to 29 degrees Celsius). Temperatures exceeding 90 degrees Fahrenheit (32 degrees C) will damage juniper bonsai and temperatures over 100 degrees Fahrenheit (37 degrees C) can be fatal.
Fertilizer requirements
Juniper bonsai should be fertilized no more than once per month during the spring and summer. Fertilizing should only be undertaken once in March, April, May, June, July, and August. Fertilizing does not need to be undertaken in the fall or winter.
Should you keep a juniper indoors or outdoors?
Juniper bonsai trees should only be kept outdoors due to the sunlight and water requirements of the tree. Left indoors for prolonged periods will kill the tree. Keep in sunlight for 4 hours per day or rest in a shaded area throughout the day.
How often should you repot a juniper bonsai?
Juniper bonsai should be repotted every 3 to 5 years. Telltale signs are roots growing through the topsoil or a decrease in the health of the tree. Repotting a juniper should not be undertaken every year.
How fast to jumper bonsai grow
Juniper care in the summer
To care for juniper in summer:
- Keep in direct sunlight for no more than 4 hours per day – ideally, you can palace a juniper in the shade during the summer.
- Fertilize a juniper only once per month.
- Check the topsoil at least three times per day – should the topsoil be dry, then the juniper will need to be watered – junipers will typically need to be watered at least twice per day in summer.
- Regularly check for signs of insect infestations between the tips/needles of the tree
- Ensure temperatures do not exceed 85 degrees Fahrenheit
Juniper care in the winter
To care for juniper bonsai in the winter
- Water your tree once or twice per week – avoid watering the tree when temperatures drop below freezing.
- Avoid cold temperatures lower than 10 degrees Fahrenheit
- Cover in a tarp in heavy freezing snowfall
- Should the temperature dip below freezing you can move your juniper indoors to the cold part of your house such as a garage.
Study on Juniper bonsai
I also got in touch with a few professionals to ask them how to train a juniper bonsai
First I got in touch with my local botanical gardens – here were their thoughts:
“Junipers are relatively straightforward to train – the only real area of difficulty is pruning the needles or tips of the tree. Ensure you don’t remove these all in one go but individually”
I also asked 20 plant paladin readers how difficult juniper bonsai where to train – here were their responses:

My top picks for the gear you will need!
So like I mentioned earlier, over the past three years of running PlantPaladin, hundreds of people have asked me for my recommendations on the best bonsai gear on the market.
Having spent thousands of dollars on bonsai items these past few years and tested at least 100 bonsai-specific products, I’ve listed my favorite products below – All of which I highly recommend and think you can get great value.
They can purchase directly by clicking the link to take them to Amazon.
Bonsai Tool Set: One of the significant challenges I’ve had is finding a toolset that was not only durable but didn’t break the bank. SOLIGT has recently developed a fantastic bonsai tool set that covers all the tools you need to trim, prune, and repot your trees. – You can grab it here.
Complete Bonsai Set: Many of you will want to grow your bonsai trees entirely from scratch, but finding the varicose seeds, pots, and other items in one place can be challenging. Leaves and Sole then have created a complete bonsai set that I’ve personally used that ticks all the boxes. You can grab it here.
Bonsai wire: The number of times I’ve run out of wire for my bonsai or purchased cheap bonsai wire that doesn’t do the job is embarrassing for me to admit. After a lot of trial and error, I found that using Hotop’s aluminum bonsai wire is one of the best options on the market. This can easily be used for both indoor and outdoor bonsai. You can grab it here.
This post was written by Fehed Nicass who has been passionate about bonsai for over 3 years.