
This website is supported by its readers. If you click one of my links I may earn a commission. I am also a participant in the Amazon affiliates program and I will also earn a commission from qualified purchases.
For the past 12 months, I’ve been trying to add some taper to the trunk of one of my bonsai. The trunk of the tree isn’t ideal for bonsai at the moment with it being way too long and completely untapered. Luckily I recently came across bonsai trunk chopping. So what exactly is a bonsai trunk chop?
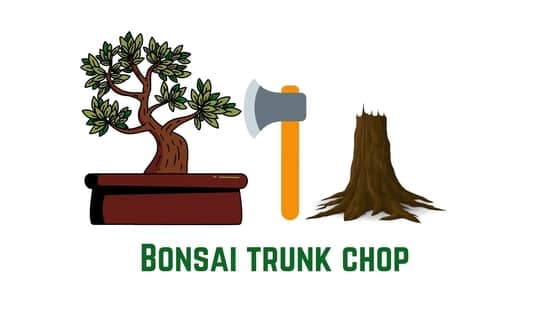
Bonsai trunk chopping is the process of chopping the trunk of a tree to improve the tree’s aesthetics. Bonsai trunk chopping can also add taper and girth to a bonsai trunk. Trunk chopping is particularly effective for larger-sized trunks that require a new leader branch.
So what exactly are the benefits and drawbacks of bonsai trunk chopping? And when should bonsai trunk chopping be avoided? Keep reading to find out more!
Just a quick heads up, over the past three years of running Plantpaladin, hundreds of people have asked for product recommendations. As such, You can find my favorite indoor bonsai tree here (link takes you to Bonsaiboy), my favorite outdoor bonsai tree (link takes you to Bonsaiboy), or have a look at all the products I recommend here.
Bonsai trunk chop
One of the things that still blows my mind about bonsai is that seemingly damaging a bonsai tree can drastically improve its appearance.
Growing things like sacrifice branches, nebari, jin, or sabamiki all require significant carving and cutting to achieve the desired look.
One of the most common techniques then used to strengthen and create a more visually appealing bonsai trunk is the art of bonsai trunk chopping.
Now, this can be quite a difficult concept to grasp for those of you new to bonsai keeping and so I got in touch with a few bonsai gurus, visited my local botanical gardens, and even tried to attempt this myself.
To summarize:
- Bonsai trunk chop knew as bonsai trunk chopping, hacking, or reduction is the process of cutting back or reducing the size of a bonsai trees trunk
- This is most often done with a sharp saw or knife where the top part of a bonsai trunk is cut off.
- It is most commonly used in larger trunks or trees that are currently too big to be used for bonsai.
- Bonsai trunk cutting is typically done either above a new leader branch – a leader branch is the branch of your bonsai that will eventually turn into the new trunk of your tree.
- Other bonsai trunk chopping techniques require a straight cut below any branches – this technique will require no leader branches.
- Bonsai trunk chopping can result in a more visually pleasing, aesthetic, and natural-looking bonsai tree.
- The technique however can damage your tree if done incorrectly and will require months if not years of patients to see the benefit from.
How to chop bonsai trunk
So now you know what bonsai trunk chopping is, what is the process you need to follow to chop the trunk of a bonsai?
There are many different techniques you can use to chop bonsai trunk, but the following are the most popular:
- Blind chop
- V cut chop
Now depending on the style or effect you want to have on your bonsai tree will depend on the technique you decide to opt for.
Let’s explore these in more detail below.
Blind bonsai trunk chop
The blind bonsai trunk chop is easily the most common type of trunk chop undertaken on bonsai trees.
As such it is relatively beginner-friendly and can be achieved on most bonsai without much harm or damage.
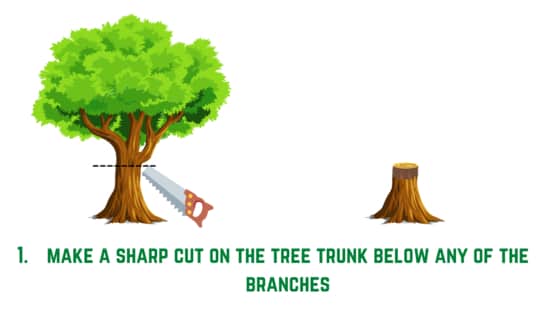
This technique then assumes that you do not want a new leader branch that will become the new trunk and so it will be achieved by cutting below any of the branches of your tree.
Using the straight technique you won’t have any idea where the new branches or buds will form so one of the downsides of this technique is that it is a bit of guesswork on what the new shoots will look like when they grow out.
How to chop a bonsai using blind reduction?
To use the blind technique, use a sharp knife or saw and make a clean cut underneath all of the branches of your bonsai.
Then apply cut paste or wood sealant to the newly created wound to stop the tree from dying.
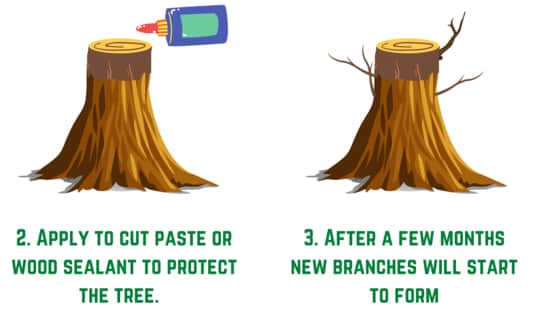
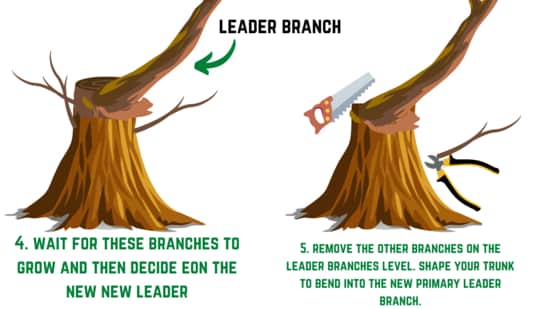
New shoots will eventually start to grow where you can pick which of these branches you want to become the new leader.
Then carve the remainder of the trunk to the new primary branch and you will have completed the blind bonsai trunk chop technique.
What to avoid when using blind bonsai trunk chop?
The biggest thing to avoid with this technique is having a bent or slanted cut.
Whilst a bent or slanted cut works well for other techniques, as we have no clue as to where the branches will grow using this technique, cutting at an angle can end up causing the branches of our tree to grow in different directions than we had anticipated.

Like all bonsai trunk chop jobs, ensure you use ample cut paste to ensure your tree does not die and ensure you check for signs of pest or fungal infections.
Your bonsai will be in a weakened state after the chop and so we need to ensure we pay special attention to it during the healing process.
This will help avoid things like insect infestations or fungal infections.
What trees does blind bonsai trunk chop work best for?
Blind bonsai trunk chop or blind bonsai trunk reductions work best on trees with a straight tree trunk. Elms and Cypresses tend to work best as well as any deciduous species. Avoid conifers that do not benefit from any form of bonsai trunk chop.
V-cut bonsai trunk chop
The second bonsai trunk chop technique that is a little bit more complicated but ideal for creating bends or more aesthetic-looking trees is the V-chop technique.
This works well for when you have been growing a bonsai tree trunk for size only to realize it is now time to taper this back – to get your tree looking more like a traditional bonsai.
This technique then will require you to create a new branch leader that over time will merge into the new trunk of your tree – this is particularly useful for when you want to grow bends in your tree.
Its name typically comes from the fact that it looks like a V shape once completed.
How to chop a bonsai using the v- cut chop?
To use the V-cut chop technique, decide on the branch of your bonsai that you would like to become the new primary leader.
Then, using a sharp sword, knife, or cutting device make a clean cut at a slight angle above the new leader branch.
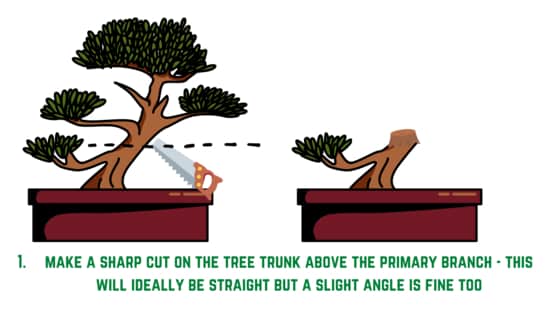
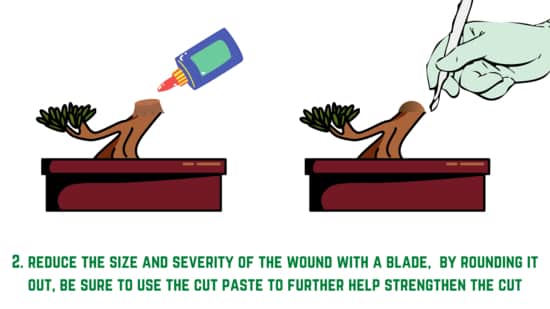
Using a knife aim to try and carve a rounded edge on the new wound- this will help it heal, and help create a natural bend.
Apply cut paste or wood sealant to the wound.
Once healed and after about a solid year of growth, the new leader branch and trunk will have merged.
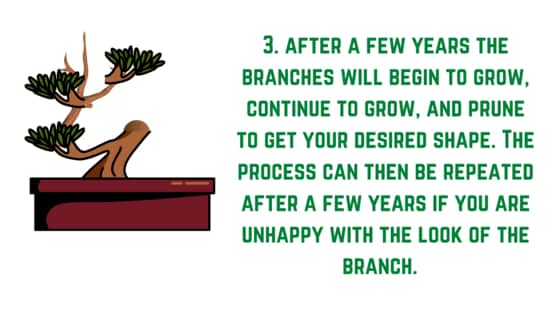
You can then repeat this process if you would like new bends in your tree or simply let your trunk thicken further by letting it grow out over a few years.
What to avoid when using v-cut bonsai trunk chop?
When it comes to using the v-cut technique the most important thing is that this method has a primary branch to merge with.
This is because the primary branch will eventually become part of the bonsai trunk and so should only be done if a primary branch is available.
Whilst the v-cut technique can be done with a slightly bent or angled cut, ensure that this is covered thoroughly or molded into a rounded edge to speed up the healing process and make it look more aesthetically pleasing.
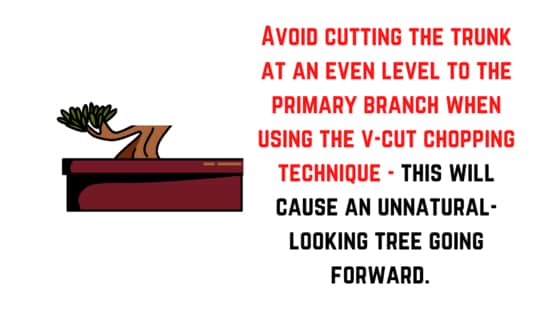
Finally, the cut should not be made at the same level as the primary branch. V-cuts are rarely straight – As this will create an unnatural look when the tree grows in size.
What trees does v-cut bonsai trunk chop work best for?
V-cut bonsai trunk chop works best when dealing with trees with strong primary branches that will make good leaders. Chinese elms, maple, or oak bonsai work particularly well for the v-cut technique. Avoid evergreen species like Juniper or pine which can die from the chopping process.
What bonsai trunk chop method is best?
Neither the blind nor v-cut methods are better than each other. The blind trunk chop method is more effective at creating thicker branches for vertical bonsai styles like sumo bonsai. The v-cut technique is more effective at creating bonsai styles with many bends such as moyogi styles.
Bonsai styles and trunk chopping
Now one of the things that are a little bit confusing is the relationship to bonsai tree chopping and the style of bonsai you are looking to design.
Whilst the two methods laid out above are the two best methods for chopping and creating aesthetic and natural bonsai trunks, these techniques will often have to be used together to achieve the designated style you wish to opt for.
Bonsai tree styles can include:
- Sumo bonsai
- Spreading style (also known as broom style)
- Moyogi style
- Hokidachi
- Shakan (slanted)
- Cascade
- Any many more
To give you an example of how we would create three of these styles quickly let’s explore this below:
Creating sumo bonsai with bonsai trunk chopping
The trunk of a sumo bonsai is relatively short, and for lack of a better term, fat, when compared to other bonsai styles.
In order to achieve this look then creating a thick trunk that tapers outwards the taller it gets will usually work best.
For this look then the best bonsai chopping method required will be the blind cut.
It is very rare that there are any significant bends or twists in the trunk of a sumo style bonsai so only blind trunk chopping should be used to achieve this effect.
Spreading style with bonsai trunk chopping
Spreading, spreading oak or broom style is a relatively common style of bonsai tree.
This tree mainly replicates the way natural oak trees look in the wild hence the name.
They typically have a longer thinner branch and then a wider canopy resembling a broom.
To grow this then takes a relatively long process and will also require a lot of straight cuts until the desired length of the trunk has been met.
Then continue by using the v-cut chopping technique to grow out the branches.
This process will take around 4 to 6 years to complete.
Creating moyogi bonsai with bonsai trunk chopping
Moyogi bonsai is a style of bonsai that is relatively upright and straight although it has some bend in it, sometimes resembling a mild shape.
It typically then has lower branches than other straight upright bonsai styles.
To create billing chopping techniques should be used for the majority of the growing process.
“V-chop and blind chop are the 2 main types of techniques used to chop bonsai trunk”
FAQs on bonsai trunk chop
So hopefully the article has helped cover everything you need to know about how exactly to chop the trunk of a bonsai for aesthetic purposes.
There may be several questions you still are curious about so hopefully the following answers should help.
Can you use multiple bonsai trunk chop techniques together?
Both blind trunk chop techniques and V-cut bonsai trunk chop techniques can be used together to design an aesthetically pleasing tree. Often the blind chop technique is used to start the process of styling a trunk and then the v-cut technique is used to add bends and curves.
Do you have to chop your bonsai trunk multiple times?
The trunk of a bonsai tree will often have to be chopped multiple times to achieve a specific bonsai style. Bling bonsai trunk chops are usually done to give control over where the primary branch will grow from and then v-cut chops are done to add bends and aesthetics to a tree.
Why do people chop the trunk of their bonsai?
Bonsai reduction, chopping, or hacking is done to reduce the length of a tree trunk, to add taper to the trunk, and add directional change, or movement in a trunk that would be difficult to achieve naturally.
Bonsai owners then will manipulate their trunk by hacking, chopping, or reducing the size of the tree trunk to achieve the desired look they are going for.
How do you thicken a bonsai trunk?
To thicken a bonsai trunk naturally, grow a sacrifice branch for two to three years then remove it. Other methods to thicken a bonsai trunk include making cuts in the trunk or using tourniquets to cut off the nutrient flow of the trunk.
To read up more on sacrifice branches check out this post here.
Hopefully, the table below will help:
| Method to grow a thick bonsai trunk | Quick definition |
| Sacrifice branches | Sacrifice branches are when you grow out one branch for a period of time, usually two to three years without pruning. This then increases the girth of the trunk and the branch. |
| Scarring technique | Scarring in bonsai is when you make a vertical cut in the trunk of your tree to thicken it. Use a carving knife for best results |
| Grow your plant in the ground | Growing your bonsai in the ground means it will not be restricted by the soil in your pot. |
| Split your trunk | Making an incision in the trunk of your bonsai causes it to grow thicker, in turn forcing your bonsai branches and trunk to grow thicker |
| Bonsai tourniquets | Bonsai tourniquets force swelling in bonsai branches by cutting off the nutrients in them forcing the trunks to thicken in size. |
| The ring method | Similar to bonsai tourniquets the ring method can be used to grow out thicker trunks. |
Alternatively, if you are interested in some other methods I’d recommend having a look at my post on creating thicker bonsai branches – these can also be used for creating a thicker trunk – you can check out this post here.
Is chopping the trunk of a bonsai good or bad?
Whilst bonsai trunk chopping can be seen as a controversial method by some bonsai connoisseurs, it is neither good nor bad. Instead, bad techniques will often lead to a bad outcome, just as a good technique will lead to a good outcome.
To help explain this in more detail I’ve put together the advantages and disadvantages of this below:
Advantages of bonsai trunk chopping
- Can help speed up the process it takes to create specific bonsai styles
- Multiple techniques make it easy to achieve the design you want
- Can add a strong taper to your trunk making your bonsai look more like a natural tree.
- Makes for much more visually and aesthetically pleasing trees.
On top of this, there are several general benefits of keeping bonsai tres such as boosting your mood, cleaning the air, and teaching us patience.
Disadvantages of bonsai trunk chopping
- Can be a little difficult to learn if you are new to bonsai
- Will leave scars on your tree that might take a while to heal
- It wIll take multiple years to see the results of your trunk chopping
- Can be looked down on by some expert bonsai keepers.
What is the best time of year to chop the trunk of a bonsai?
Early spring is the best time to implement bonsai trunk chopping – between March and May. Making large cuts to the tree in the fall or winter will mean your bonsai will not have time to callus the cuts and heal properly. This will make it more prone to fungal and insect infestations.
What is a bonsai leader branch?
A bonsai leader branch is a primary branch of a bonsai tree that can be easily merged into the trunk of a tree. A bonsai trunk then is often chopped or reduced in size and then merged with the leader branch to create a more visually pleasing tree.
The primary leader branch then becomes part of the trunk.
How old should my tree be before I use bonsai trunk chopping?
Bonsai trunk chopping should only occur in larger, older-aged trees. Trunk chopping is often undertaken on finished trees that are 10 to 15 years old. The older trees get, the heavier and harder to manage branches become, so chopping is undertaken to ensure a strong taper continues.
Best tree species for bonsai trunk chop?
Elms, Acer, Maples, oak, and Ficus species are all fantastic candidates for bonsai trunk chopping. They can often bounce back from severe damage relatively quickly. Other deciduous species also work well. Avoid coniferous or evergreen species such as pine or juniper.
How long does it take to get the results of a trunk chop?
It can take between two and five years before the results of a trunk chop can be seen. This is because once trunk chops are completed, it will take several years of trunk growth to achieve the taper or girth you want your trunk to achieve.
Several trunk chops may be required over a few years to achieve the desired look.
What is bonsai trunk chopping also called?
Bonsai trunk chop is also called bonsai trunk chopping, bonsai trunk reduction, or bonsai hacking. Whilst the names may be different the general process of cutting the size of a trunk to add new growth and taper is the same.
Are there any alternatives to trunk chopping?
The main alternatives to a bonsai trunk chop to create taper is to grow our sacrificial branches, use tourniquets, split a bonsai trunk, and follow the scarring technique. All of which will add girth to a trunk but can also add significant taper if done correctly.
Other posts to help with bonsai trunk chop
If you are reading this it’s likely that you might be new to bonsai.
Should this be the case I think the following posts will definitely help you on your bonsai journey:
- How to grow jade bonsai
- Best potting soil for bonsai
- Health benefits of bonsai
- Do bonsai trees need sunlight
- Bonsai trees and rainwater
- Repotting aftercare
- How to find the age of your bonsai
My top picks for the gear you will need!
So like I mentioned earlier, over the past three years of running PlantPaladin, hundreds of people have asked me for my recommendations on the best bonsai gear on the market.
Having spent thousands of dollars on bonsai items these past few years and tested at least 100 bonsai-specific products, I’ve listed my favorite products below – All of which I highly recommend and think you can get great value.
They can purchase directly by clicking the link to take them to Amazon.
Bonsai Tool Set: One of the significant challenges I’ve had is finding a toolset that was not only durable but didn’t break the bank. SOLIGT has recently developed a fantastic bonsai tool set that covers all the tools you need to trim, prune, and repot your trees. – You can grab it here.
Complete Bonsai Set: Many of you will want to grow your bonsai trees entirely from scratch, but finding the varicose seeds, pots, and other items in one place can be challenging. Leaves and Sole then have created a complete bonsai set that I’ve personally used that ticks all the boxes. You can grab it here.
Bonsai wire: The number of times I’ve run out of wire for my bonsai or purchased cheap bonsai wire that doesn’t do the job is embarrassing for me to admit. After a lot of trial and error, I found that using Hotop’s aluminum bonsai wire is one of the best options on the market. This can easily be used for both indoor and outdoor bonsai. You can grab it here.
This post was written by Fehed Nicass who has been passionate about bonsai for over 2 years. He currently resides in the UK and works in sales.